Updates
- 07/05 : Project 1 released.
- 07/07 : In order to pass the heaptest, you must implement the (1) ADD instruction, as well as (2) JAL, (3) BEQ, (4) JR. The project spec previously stated AND instead of ADD, but the AND instruction is already implemented for you.
- 07/07 : Memory accesses in the heap will be either 1 byte or 4 bytes (1 word).
A word access is invalid if it spans more than one block, even if every individual byte is allocated. - 07/10 : The first_fit_malloc() function must return a word aligned address (the address must be divisble by 4). This addresses the problem of reading multiple blocks at once (the crossed out line in the previous update).
- 07/12 : The behavior of the extra credit function next_fit_malloc() has been clarified.
Clarifications/Reminders
- You'll need to be on the Orchard or Hive machines to compile the test files, because they require mips-gcc and mips-ld.
- Your disassembly code for
luishould print the immediate field in lowercase hexadecimal, with no leading 0's and with a0xprepended. - Make sure your add instruction detects SIGNED overflow.
- Remember, in our program, all registers are automatically initialized to zero, except the stack pointer (
$sp) and PC. The stack pointer will be initialized to STACK_ORIGIN, while PC will be initialized to 0x1000. - Please be careful to not make typos in your disassembly printouts, such as misspelling or forgetting the newlines.
- For instructions with sign-extended immediate fields, make sure they can be printed out as negative values (rather than very large positive values)
- The bounds for memory are [0,MEM_SIZE): 0 is a valid address, but MEM_SIZE is not. However, not every memory access is valid. See the description in Task 2 for more details.
Goals
We hope this project will enhance your C programming skills, familiarize you with some of the details of MIPS, give you a better understanding of the memory layout and dynamic memory allocation, and prepare you for what's to come later in lecture when we dive into the processor.
Background
In this project, you will create an instruction interpreter for a subset of MIPS code. You'll provide the machinery to decode and execute a couple dozen MIPS instructions. You're creating what is effectively a miniature version of MARS! You will also be implementing your own heap memory allocation and free functions.
Readings
You will find the following readings useful for this project:
- P&H 2.1 to 2.10 (MIPS instructions, number and instruction representations in binary)
- K&R 6.1,6.2,6.4,6.7,6.8,6.9,7.8.5,8.7 (structs, unions, bitfields, memory)
The MIPS green sheet provides information necessary for completing this project.
Getting started
This is an individual assignment; you must work alone.
Make sure you read through the project first.
Copy the files in the directory ~cs61c/proj/01 to your proj1 directory, by entering the following commands:
$ mkdir ~/proj1
$ cp -r ~cs61c/proj/01/* ~/proj1
The files you will need to modify and submit are:
disassemble.c: C source file which implements disassemble.memory.c: C source file which implements the memory interface.processor.c: C source file which implements the processor.
Also included are these files. You do not need to look at load_program.c, load_program.h, or elf.h, but it may be helpful to look at all the other files.
sim.c: C source file which contains the top level simulator. This file contains the main function.processor.h: C header file for processor.memory.h: C header file for memory.disassemble.h: C header file for disassembler.load_program.c: C source file which implements loading an executable file.load_program.h: C header file for program loader.elf.h: C header file for ELF definitions. (ELFis the standard executable file format in Linux.)Makefile: File which records all dependencies.mipscode/*: Assembly and C source files for tests.
The MIPS Simulator
The files provided in the start kit comprise a
framework for a MIPS simulator. You'll complete the program by adding code
to processor.c and memory.c to execute
each instruction and perform memory access. Additionally, youll add code to disassemble.c to print out the human-readable disassembly
corresponding to the instructions machine code. Your simulator must be
able to simulate the machine code versions of the following MIPS machine instructions.
We've already implemented the instructions in the second table for you, so you
have an example of R-type, I-type, and J-type instructions.
It is critical that you read and understand the definitions in processor.h before starting the project. If they look mysterious, re-read chapter 6 of K&R, which covers structs, bitfields, and unions. Check yourself: why does sizeof(inst_t) == 4?
|
INSTRUCTION |
TYPE |
OPCODE |
FUNCT |
OPERATION |
|
sll rd,rt,shamt |
R |
0x0 |
0x0 |
R[rd] <- R[rt] << shamt |
|
srl rd,rt,shamt |
R |
0x0 |
0x2 |
R[rd] <- R[rt] >> shamt |
|
sra rd,rt,shamt |
R |
0x0 |
0x3 |
R[rd] <- (signed)R[rt] >> shamt |
|
jr rs |
R |
0x0 |
0x8 |
PC <- R[rs] |
|
jalr rs |
R |
0x0 |
0x9 |
tmp <- PC + 4 PC <- R[rs] R[31] <- tmp |
|
add rd,rs,rt |
R |
0x0 |
0x20 |
R[rd] <- R[rs] + R[rt] (must check for SIGNED overflow) |
|
addu rd,rs,rt |
R |
0x0 |
0x21 |
R[rd] <- R[rs] + R[rt] |
|
xor rd,rs,rt |
R |
0x0 |
0x26 |
R[rd] <- R[rs] ^ R[rt] |
|
slt rd,rs,rt |
R |
0x0 |
0x2a |
R[rd] <- (signed)R[rs] < (signed)R[rt] |
|
jal target |
J |
0x3 |
- |
R[31] <- PC + 4 PC <- {(upper 4 bits of PC+4), address*4} |
|
beq rs,rt,offset |
I |
0x4 |
- |
if(R[rs] == R[rt]) PC <- PC + 4 + signext(offset)*4 |
|
bne rs,rt,offset |
I |
0x5 |
- |
if(R[rs] != R[rt])
PC <- PC + 4 + signext(offset)*4 |
|
addiu rt,rs,imm |
I |
0x9 |
- |
R[rt] <- R[rs] + signext(imm) |
|
xori rt,rs,imm |
I |
0xe |
- |
R[rt] <- R[rs] ^ zeroext(imm) |
|
lui rt,imm |
I |
0xf |
- |
R[rt] <- imm << 16 |
|
lb rt,offset(rs) |
I |
0x20 |
- |
R[rt] <- signext(LoadMem(R[rs]+signext(offset), byte)) |
|
lw rt,offset(rs) |
I |
0x23 |
- |
R[rt] <- LoadMem(R[rs]+signext(offset), word) |
|
lbu rt,offset(rs) |
I |
0x24 |
- |
R[rt] <- zeroext(LoadMem(R[rs]+signext(offset), byte)) |
|
sb rt,offset(rs) |
I |
0x28 |
- |
StoreMem(R[rs]+signext(offset), byte, R[rt]) |
|
sw rt,offset(rs) |
I |
0x2b |
- |
StoreMem(R[rs]+signext(offset), word, R[rt]) |
The following instructions have already been implemented for you.
|
INSTRUCTION |
TYPE |
OPCODE |
FUNCT |
OPERATION |
|
syscall |
R |
0x0 |
0xc |
(perform system call) |
|
and rd,rs,rt |
R |
0x0 |
0x24 |
R[rd] <- R[rs] & R[rt] |
|
or rd,rs,rt |
R |
0x0 |
0x25 |
R[rd] <- R[rs] | R[rt] |
|
j target |
J |
0x2 |
- |
PC <- {(upper 4 bits of PC+4), address*4} |
|
ori rt,rs,imm |
I |
0xd |
- |
R[rt] <- R[rs] | zeroext(imm) |
If you have any questions about the semantics of the instructions, consult P&H (4th ed.) Section 2.9 and Appendix B, particularly if you find our pseudocode for loads and stores to be confusing. (The first argument to LoadMem and StoreMem in our pseudocode is the memory address. The second argument to both LoadMem and StoreMem is the width of the access. The third argument to StoreMem is the store data.)
The MIPS system you're implementing is little-endian. Look at P&H (4th edition) page B-43 for further information on endianness (byte order). We chose little endian because the host machines are little endian, and this avoids some complexity for sub-word loads and stores.
In our variant of MIPS, beq and bne are not delayed branches. (If you dont know what that means, just ignore it; your default assumption about the behavior of branches is probably correct for this project. We'll talk about this topic later in the semester.)
Initially, you will be able to run a program called "simple", which only uses the instructions we implemented for you, by running the following commands:$ cd ~/proj1 $ make $ ./mips-sim mipscode/simple Hello, world! exiting the simulator
The Framework Code
The framework code we've provided begins by doing the following.
- It reads the executable program binary, whose filename is specified on the command line, into the simulated memory, starting at address 0x00001000.
- It initializes all 32 MIPS registers to 0, sets the $sp to STACK_ORIGIN, and sets the program counter (PC) to 0x00001000.
- It sets flags that govern how the program interacts with the user. Depending on the options specified on the command line, the simulator will either show a dissassembly dump of the program on the command line, or it will execute the program.
It then enters the main simulation loop, which simply
calls execute_one_inst() repeatedly until the simulation is complete.
execute_one_inst() performs the following tasks:
- It fetches an instruction from memory, using the PC as the address.
- It examines the opcode to determine what instruction was fetched.
- It executes the instruction and updates the PC.
The framework supports a handful of command-line options:
-iruns the simulator in "interactive mode," in which the simulator executes an instruction each time the Enter key is pressed. The disassembly of each executed instruction is printed.-truns the simulator in "tracing mode," in which each instruction executed is printed.-rinstructs the simulator to print the contents of all 32 registers after each instruction is executed. It's most useful when combined with the -i flag.-dinstructs the simulator to disassemble the entire program, then quit.
Your Job
Your job is to complete the implementations of
the disassemble() function in
disassemble.c, the execute_one_inst() function in processor.c, and the load_mem(), store_mem(), access_ok(), first_fit_malloc(), block_free() functions in memory.c. Right now, they only operate correctly
for the and, or, ori, j,
and syscall instructions. By the
time you're finished, they should handle all of the instructions in the table
above.
Task 1: Implement the Disassembler (20 pts)
You must following the formatting instructions below EXACTLY in order to receive any credit for the autograder tests for this task! Each individual test is all-or-nothing.
- Print the instruction name. If the instruction has arguments, print a tab (\t).
- Print all arguments, following the order and
formatting given in the INSTRUCTION column of the table above.
- Arguments are generally comma-separated (lw/sw, however, also use parentheses), but are NOT separated by spaces.
- Register arguments are printed as a $ followed by the register number, in decimal (e.g. $0 or $31).
- Zero-extended immedates (e.g. for ori) are printed as lowercase hexadecimal numbers with a leading 0x but without extra leading zeros (e.g. 0x0 or 0xffff).
- Jump addresses should be printed like zero-extended immediates, but multiplied by 4 first. (Assume the upper 4 bits of PC+4 are zero.)
- Sign-extended immediates (e.g. for addiu, sw, or beq) are printed as signed decimal numbers (e.g. -12 or 48). For branch offsets, multiply the offset by 4.
- Your disassembly code for lui should print the immediate field in lowercase hexadecimal, with no leading 0's and with a 0x prepended.
- Shift amounts (e.g. for sll) are printed as unsigned decimal numbers (e.g. 0 to 31).
- Print a newline (
\n) at the end of an instruction. - We have provided a disassembly test for you. Since a test is only covering a subset of possible scenarios, however, passing this test does not mean that your code is bug free. You should identify the corner cases and test them yourself.
Run the disassembly test by typing in
"make disasmtest". If
your disassembly matches the output, you will get a DISASSEMBLY TEST PASSED! message.
$ cd ~/proj1
$ make disasmtest
./mips-sim -d mipscode/insts > insts.dump
DISASSEMBLY TEST PASSED!
If your disassembly does not match the output, you will
get the difference between the reference output and your output, and a
DISASSEMBLY TEST FAILED! message. Make sure you at least pass this test before submitting disassemble.c.
$ cd ~/proj1
$ make disasmtest
./mips-sim -d mipscode/insts > insts.dump
56c56
< 000010dc:
addiu        $30,$0,11
---
> 000010dc:
addiu        $30,$0,0x11
66c66
< 00001104:
bne        $4,$5,44
---
> 00001104:
bne        $4,$5, 44
DISASSEMBLY TEST FAILED!
To continue testing your disassembler on your own, see the Testing section below.
Task 2: Implement the Memory Interface (50 points)
There are five functions in memory.c you are required to implement for this task:
access_ok(), load_mem(), store_mem(), first_fit_malloc(), and block_free().
When access_ok() is called, the function should return 1 if the memory access is valid, and return 0 if the access is invalid.
The write_permission parameter will be 0 if the access is read-only, and non-zero if the access must write to memory.
Invalid accesses include:
- Attempting to access any memory address in the reserved section: [0,CODE_BOTTOM)
- Attempting to write into a read-only memory address. For this project, the only read-only section is the code section: [CODE_BOTTOM,CODE_TOP).
- Attempting to access unallocated memory in the heap: [HEAP_BOTTOM,HEAP_TOP).
Memory in the heap must be allocated using
first_fit_malloc()ornext_fit_malloc()before it can be accessed. - Improperly alligned accesses:
lwandswrequire 4-byte alignment, whilelb, lbu,andsbare always properly aligned. - Attempting to access a memory address that is greater than or equal to MEM_SIZE.
Note: The [ bracket is inclusive, and the ) parenthesis is exclusive. The memory range [X,Y) means X is part of the range, while Y is not.
Memory Layout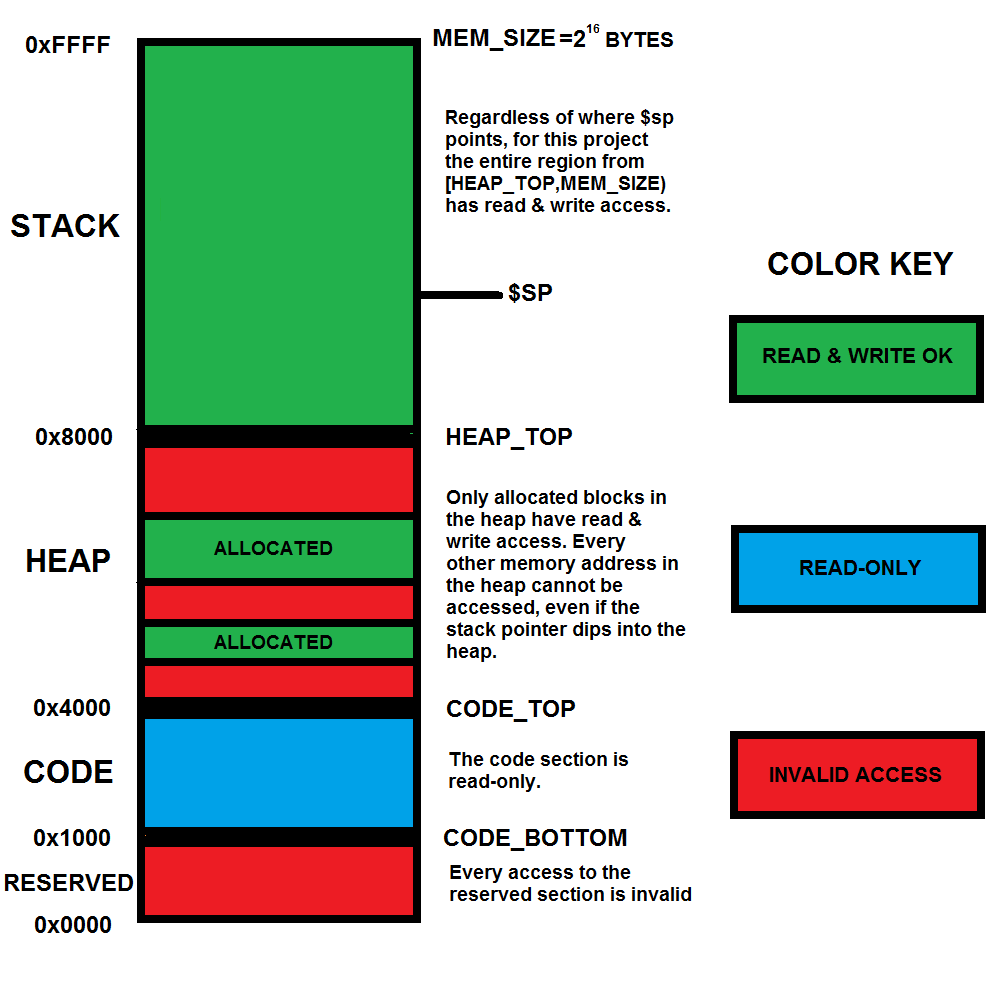
For invalid memory accesses, you must have access_ok() return 0 in memory.c, which will cause the simulator to print an error message and abort.
This is analogous to the segmentation fault you may see when an x86 program does an illegal memory access. Since load_mem() and store_mem() call access_ok(), you do not need to write additional code inside these functions to check for valid memory accesses.
You will also need to implement a system for dynamic memory allocation in the heap. We will accomplish this by introducing two new MIPS syscalls (these do not exist in standard MIPS or MARS). The table below follows the formatting of the Syscalls tab of the MARS Help window:
| Service | $v0 Code | Arguments | Result |
| first-fit malloc | 61 | $a0 = number of bytes to allocate | $v0 contains word-aligned address of allocated memory Returns NULL if allocation failed |
| free | 62 | $a0 = beginning address of an allocated block of heap memory | Frees block if valid address No action if $a0 = NULL |
For this project, you can assume the heap has a fixed size, i.e. [HEAP_BOTTOM,HEAP_TOP) with bounds that do not change. Since you must keep track of allocated blocks on the heap, you must be able to differentiate between (1) an allocated memory address, (2) an unallocated memory address, and (3) the beginning of a block of allocated memory in the heap. Allocated blocks of memory can NOT "wrap around the heap"; they must be contiguous in memory and not spill in to the stack.
We have given you a starting point for keeping track of blocks allocated on the heap (the uninitialized uint8_t * global variable heap_status), but it is up to you to decide how you will implement it.
You are also free to come up with an entirely different implementation, but the only file you are allowed to change for this task is memory.c.
You should initialize heap_status (or your own equivalent) in the function init_heap_status().
Remember, your access_ok() function must be able to determine if any arbitrary address in the heap is allocated or not.
You will implement the first fit allocation algorithm in first_fit_malloc(); if allocation succeeds, you must return the memory address that is at the beginning of the allocated block; if it fails you must return 0. Updated 07/10: The address where each allocated block begins must be word-aligned (divisible by 4). All allocated blocks in the heap, regardless of size, must be word aligned, even if the next available memory address in the heap is not word-aligned.
You also must implement the block_free() function which behaves much like free() in C.
If block_free() is passed a memory address at the beginning of a block of allocated memory in the heap, it should deallocate the entire block.
If it is passed 0 as an address, take no action.
If it is passed any other address, you must call bad_free().
We have provided a test to check your first_fit_malloc() and block_free() functions.
This test is not exhaustive, so be sure to write your own tests; specifically you may want to focus on fragmentation and edge cases.
NOTE: The heap test will not pass until you have implemented the following four instructions in the next task: (1) add (2) jal (3) beq (4) jr. UPDATED 7/7
$ cd ~/proj1
$ make heaptest
./mips-sim -r mipscode/heaptest > heaptest.trace
HEAP TEST PASSED!
There are other tests included in the mipscode folder, however you will have to run them manually following the syntax shown above: ./mips-sim -r mipscode/"testname" > "testname".trace.
Some tests will perform invalid memory accesses and will print error messages before exiting. See if you can parse through the MIPS
code on your own and determine the correct behavior. Running tests with the -i -r flags should help you debug and determine if your code behaves as desired.
Task 3: Implement the Remaining Instructions (30 points)
You can look to the already implemented examples to see an idea of what is expected for the remaining instructions. Be sure to use the MIPS Green Sheet in conjunction with the descriptions above to determine correct behavior.
add should check for signed overflow. In the case of overflow, call handle_arith_overflow(), providing a pointer to processor_t p as an argument.
We have provided a simple self-checking assembly test that tests several of the instructions. However, the test is not exhaustive and does not exercise every instruction. Here's how to run the test as well as the output for a working processor:
$ cd ~/proj1
$ make runtest
./mips-sim -r mipscode/insts > insts.trace
RUN TEST PASSED!
Most likely you will have bugs, so try the tracing mode or other debugging modes described in the Framework code section above.
$ ./mips-sim -t mipscode/simple
00001000: ori	$4,$4,0x10¹⁴
00001004: ori	$2,$0,0x4
00001008: syscall
Hello, world!
0000100c: ori	$2,$0,0xa
00001010: syscall
exiting the simulator
Testing
We have provided a few more tests and the ability to write your own. We described simple above, which prints out Hello, world!, and is written in assembly. Heres an example of how to add an assembly test:
- Create the new assembly file in the mipscode directory. (Use mipscode/simple.s as a template.) Lets assume your test is in mipscode/foo.s.
- Add the base name of the test to the list of ASM_TESTS in the Makefile. To do this, just add foo to the end of line 4.
Now build your assembly test, and then run it by typing in the following commands:
$ cd ~/proj1
$ make
$ ./mips-sim mipscode/foo
Don't forget about the available command-line options described above in the Framework section! You may also find it useful to dump the output to a separate file to examine later.
To test and use your malloc() and free() in MIPS, use the new syscall codes described above in the Dynamic Memory Allocation section (details also found in handle_syscall() in processor.c).
You can, and indeed should, write your own assembly tests to test specific instructions and their corner cases. You are unlikely to receive full credit if you solely rely on the tests we have provided. Furthermore, you should be compiling and testing your code after each group of instructions you implement. It will be very hard to debug your project if you wait until the end to test.
Extra Credit: Implement Next-fit (10 pts)
Fill in the function definition for next_fit_malloc() in memory.c.
You should not attempt this until you have completed the rest of the project; this algorithm is similar to the first-fit algorithm, but more difficult to implement.
You are responsible for how you choose to implement next_fit_malloc(), but you will not lose points for an incorrect implementation.
Any and all changes must take place in memory.c, but you may choose to amend or alter functions you have previously implemented provided it does not break their functionality with first_fit_malloc().
Just like first_fit_malloc(), all addresses returned should be word aligned
Clarification(07/12) : For your implementation of next_fit_malloc(), you may be using some variable to indicate where begin your next search. In the case where your block_free() function frees block A, and your next fit variable is pointed to the end of block A, your next fit pointer should "fall back" to the end of the first allocated block it finds, or it hits the beginning of the heap. It should always be at the end of an allocated block, or at the bottom of the heap.
You can think of it as if the next fit pointer were affected by gravity; the heap is like a wall, where the bottom of the heap is the ground. Each successful malloc mounts a block of wood against a wall and you place a tennis ball (your next fit pointer) on top of the block of wood. When you free a block that the tennis ball sits on, it falls down to the top of a previous block, or to the floor (bottom of the heap) if no other blocks are allocated.
You may assume that first_fit_malloc() (syscall code 61) and next_fit_malloc() (syscall code 60) will not both be called within the same program.
For the final results, only changes to the files disassemble.c, processor.c, and memory.c will be considered by the autograder.
Do NOT submit test cases, header files, or your modified Makefile.
To submit, enter in the commands:
$ cd ~/proj1
$ submit proj1
Congratulations on finishing your first project for CS 61C!