Hopefully by now you're a little more comfortable using the command line on the lab machines in Soda. This lab is designed to help you get a feel for how to set up a productive workflow on your own machine so you can complete homeworks and projects!
For starters, we need to find a good text editor that we can rely on for the rest of the semester. In the first lab, we introduced you to Emacs, a popular text editor among Unix users. You're more than welcome to download and install Emacs on your own computer. You're also more than welcome to download and install any other text editor that you want. Some are better than others. Here's what we look for in a good text editor:
sudo apt-get install vim at your terminal prompt. vim-gnome, an alternative on
Ubuntu (which has a graphical interface) can be installed using sudo apt-get install vim-gnomesudo apt-get install emacsGreat, so now we have a text editor, let's start editing some files! With each homework assignment, we'll provide you with a template with a lot of starter code already filled in for you. We highly recommend that you download this template and fill in the parts that you need to complete. This will make your life (and ours) a lot easier! Along with being a guide, this lab is also going to teach you how to submit your first assignment.
Go ahead and download the template file here!
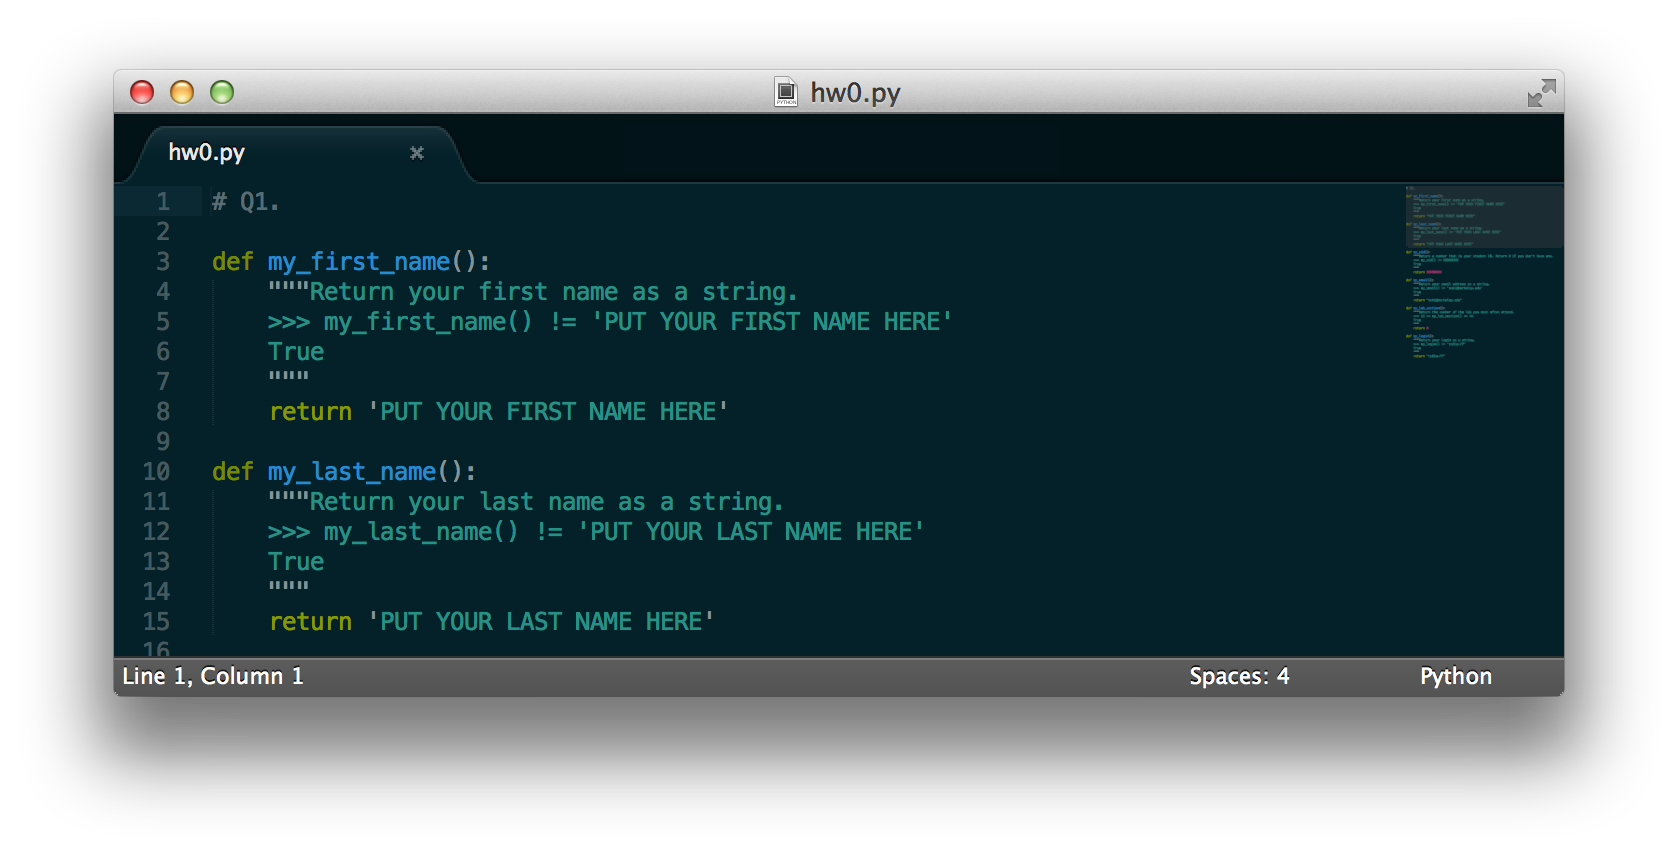
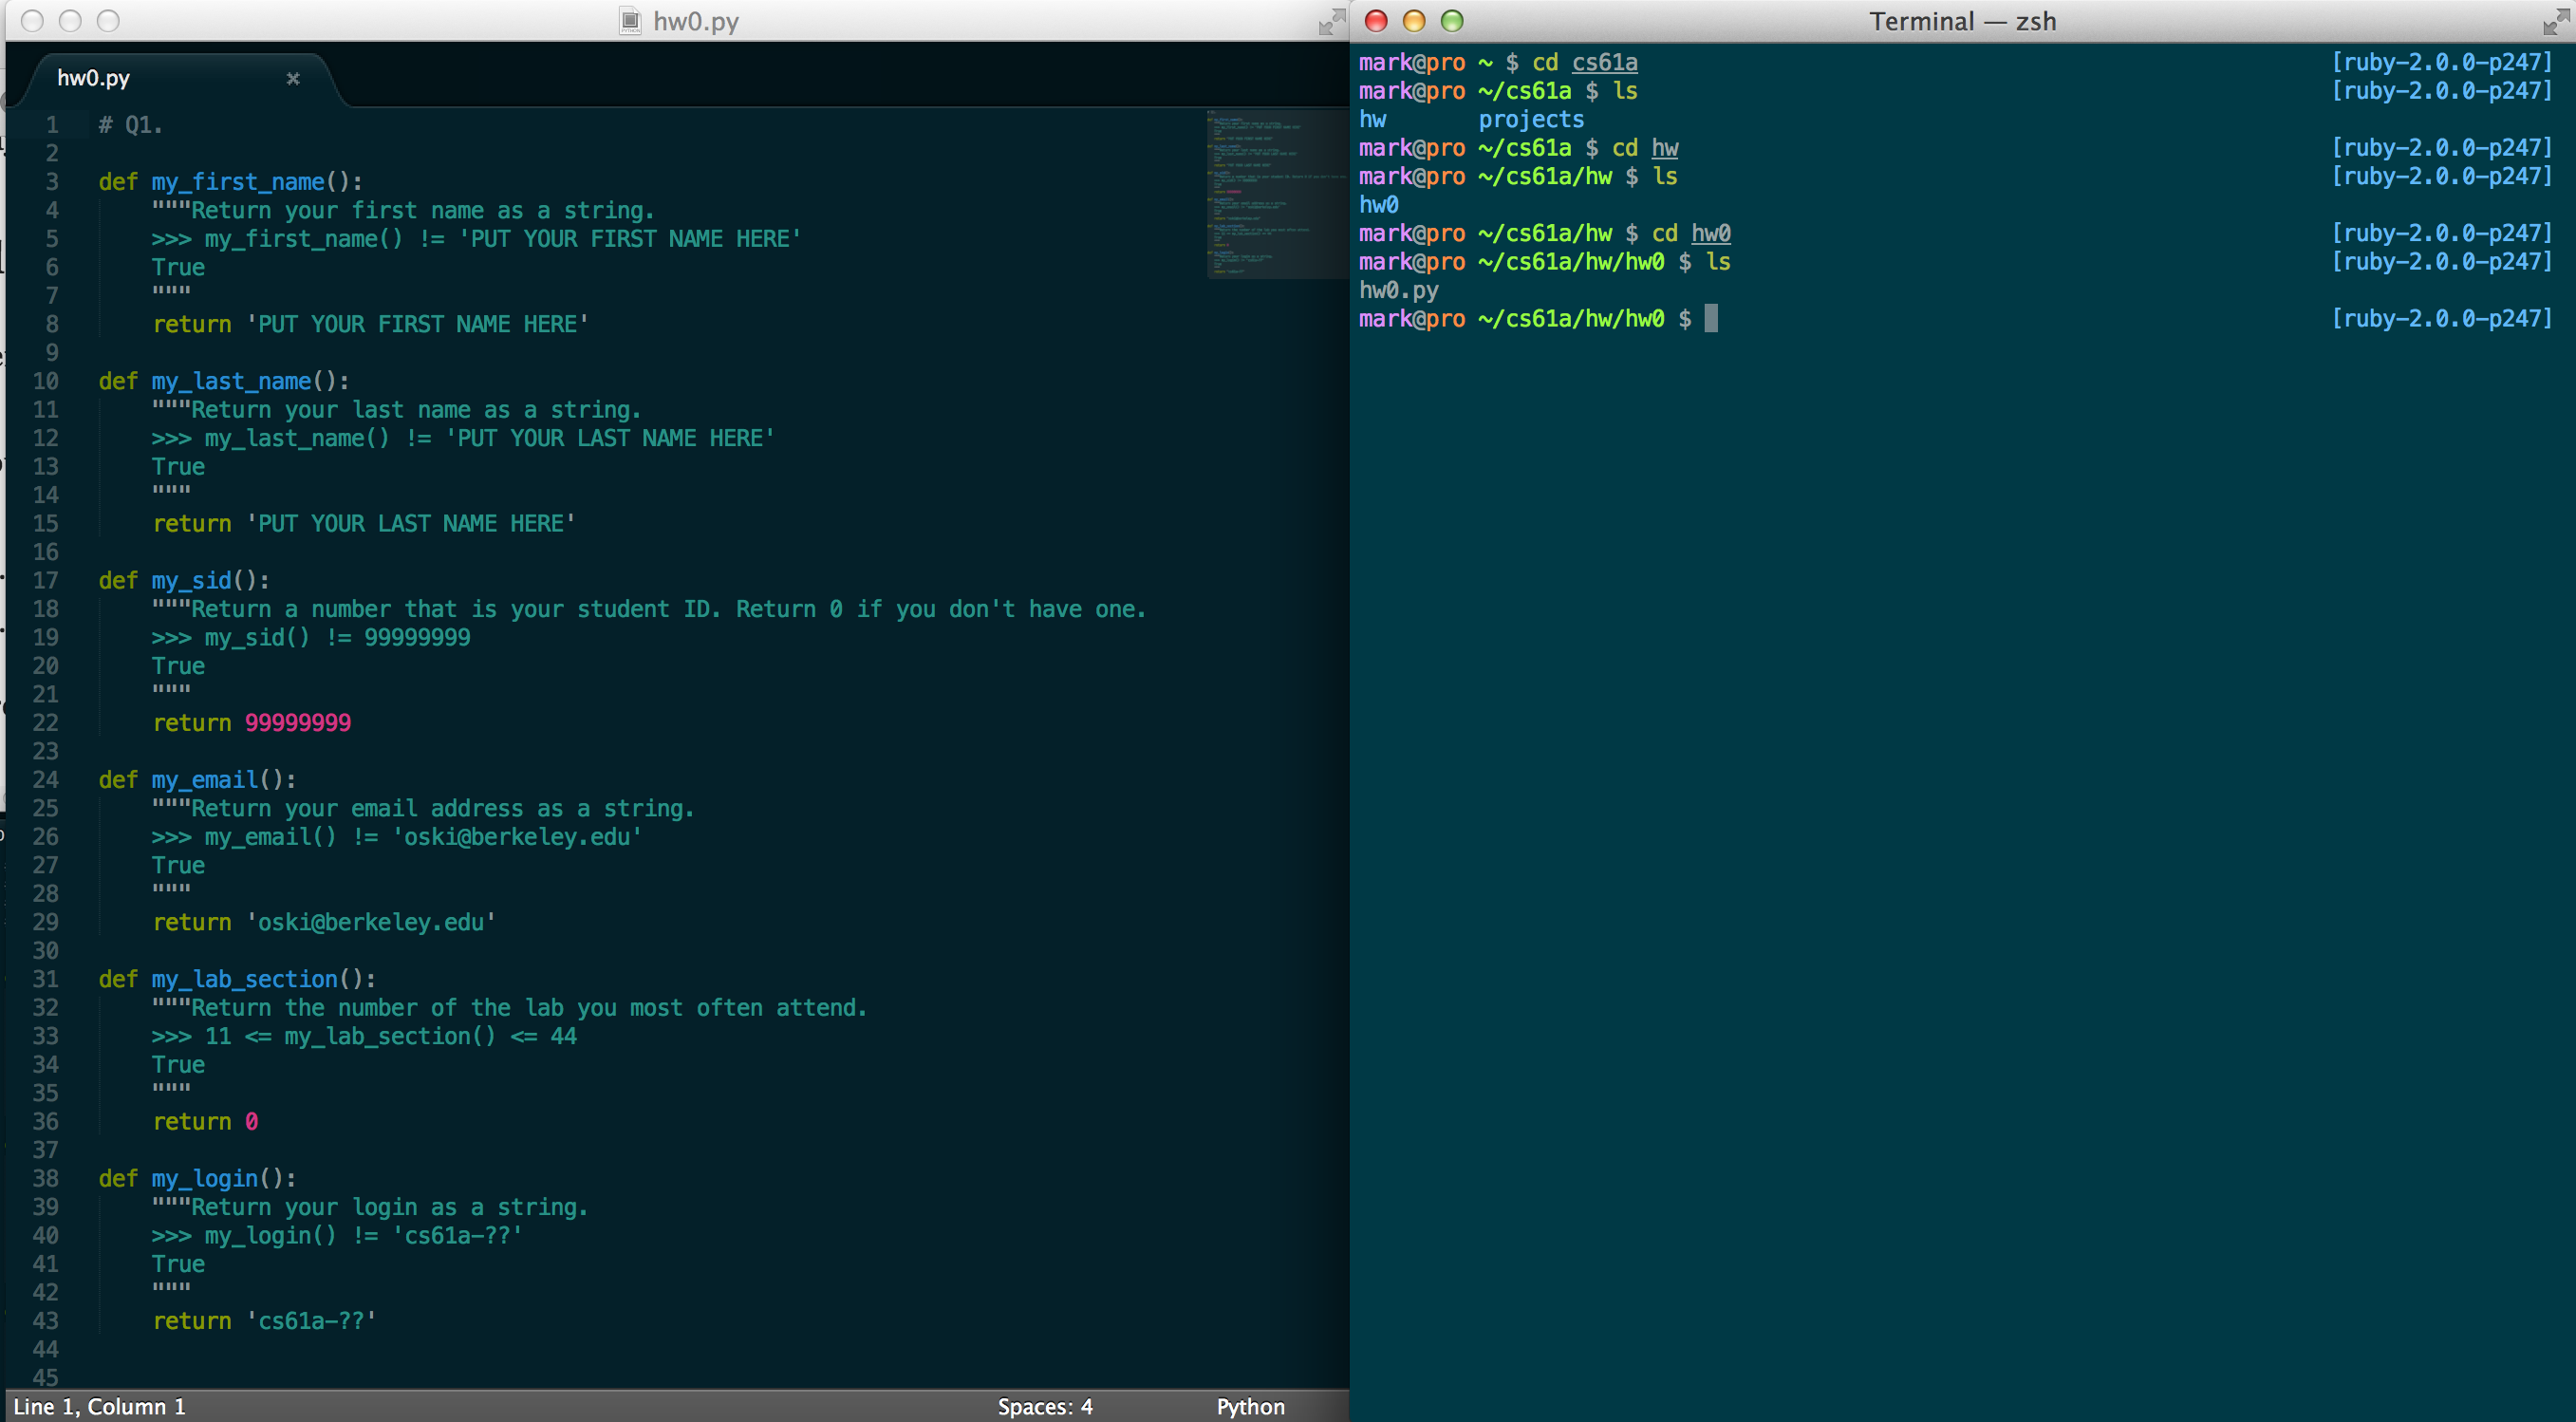
You should now have a file called hw0.py somewhere on your computer. For more specific instructions about homework 0, check out the homework 0 page here. For the screenshots that you'll see below, we're using Sublime Text 2 on Mac OS X; however, Sublime Text 2 runs the same on any computer that you have so it should function the same as ours. Open that file up in your shiny new text editor and you should see the following text:
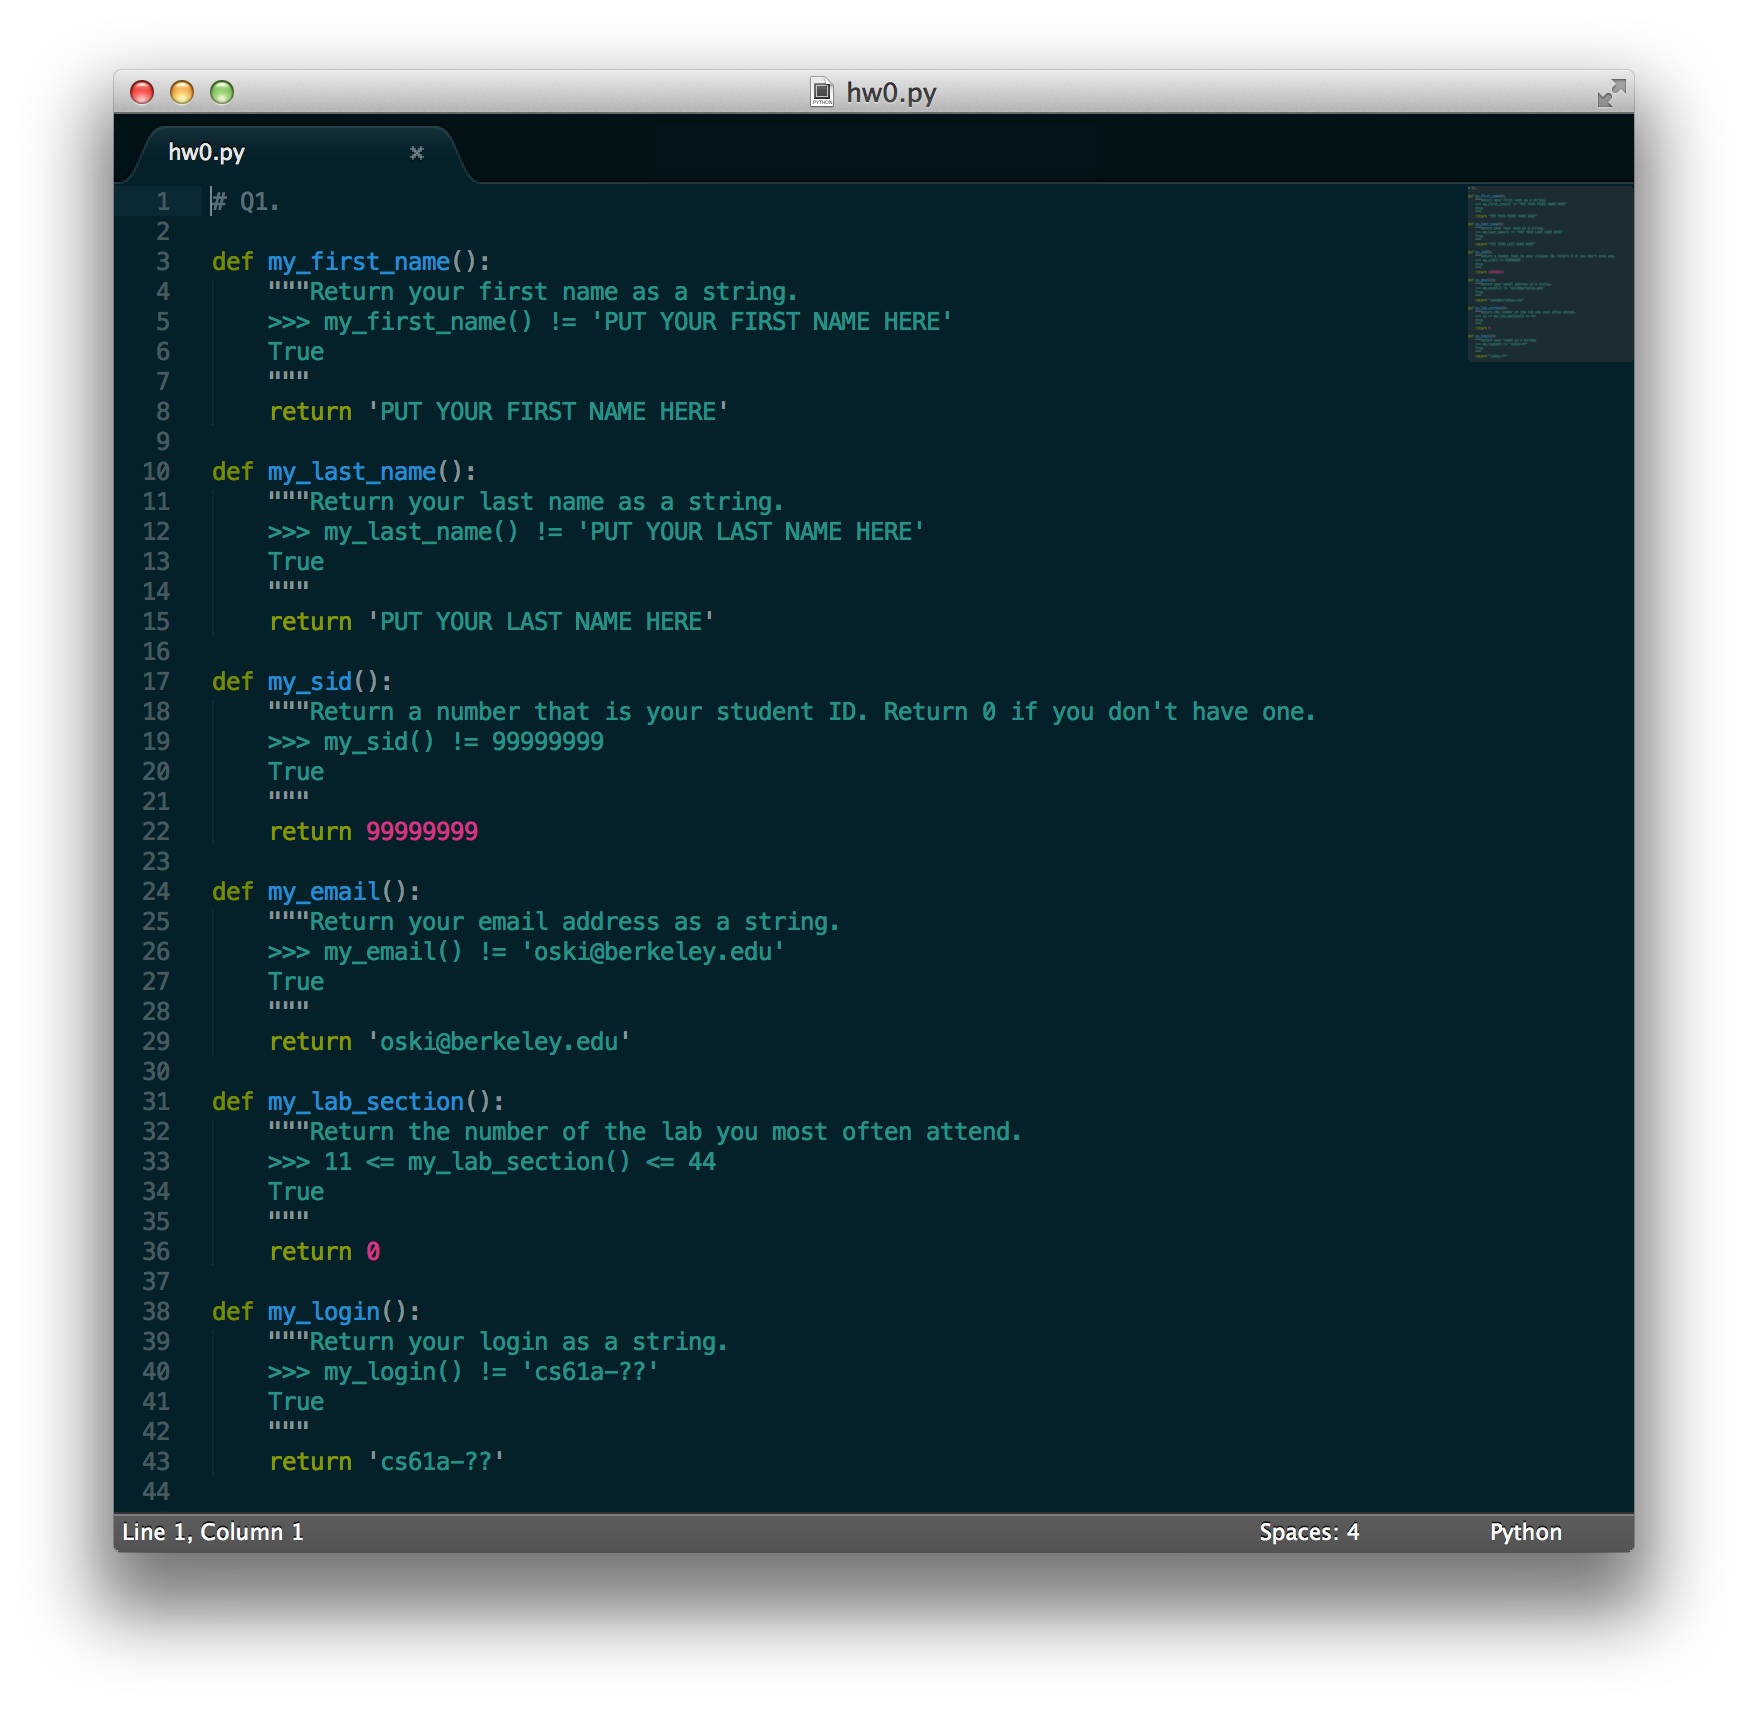
Next, we're going to edit our file to include the four required values, one in each of the functions. The first thing that you should notice is
the green text that is wrapped within three quotation marks """. (Note: the colors on your text editor will most likely be
different. For the curious, this screenshot is of the Solarized color scheme which you can find for your text editor if you are interested.) That
text is called a docstring which is a description of what the function is intended to do. Docstrings are very useful because that means other
programmers can read your docstrings and have a nice description of what the function is supposed to do, without having to read any of your
code. Within the docstring, you might notice some other funky characters such as >>>. That's the start of what we
call doctests. Doctests are a good way to also describe our function because they provide controlled input and expected output for our
functions. What that means is that we call our function having some expected value (which we write out explicitly) and expect that it does have
that value. An example might make a lot more sense here so let's take a look specifically at the my_last_name() function.
The two tests in our docstring basically check two things:
Right now, I'm in my home directory. Remember the home directory is represented by the ~ symbol (outlined in green above). Don't worry if your
terminal window doesn't look exactly the same, the important part is that the text on the left hand side is relatively the same (with a different name) and
you should definitely see a ~.
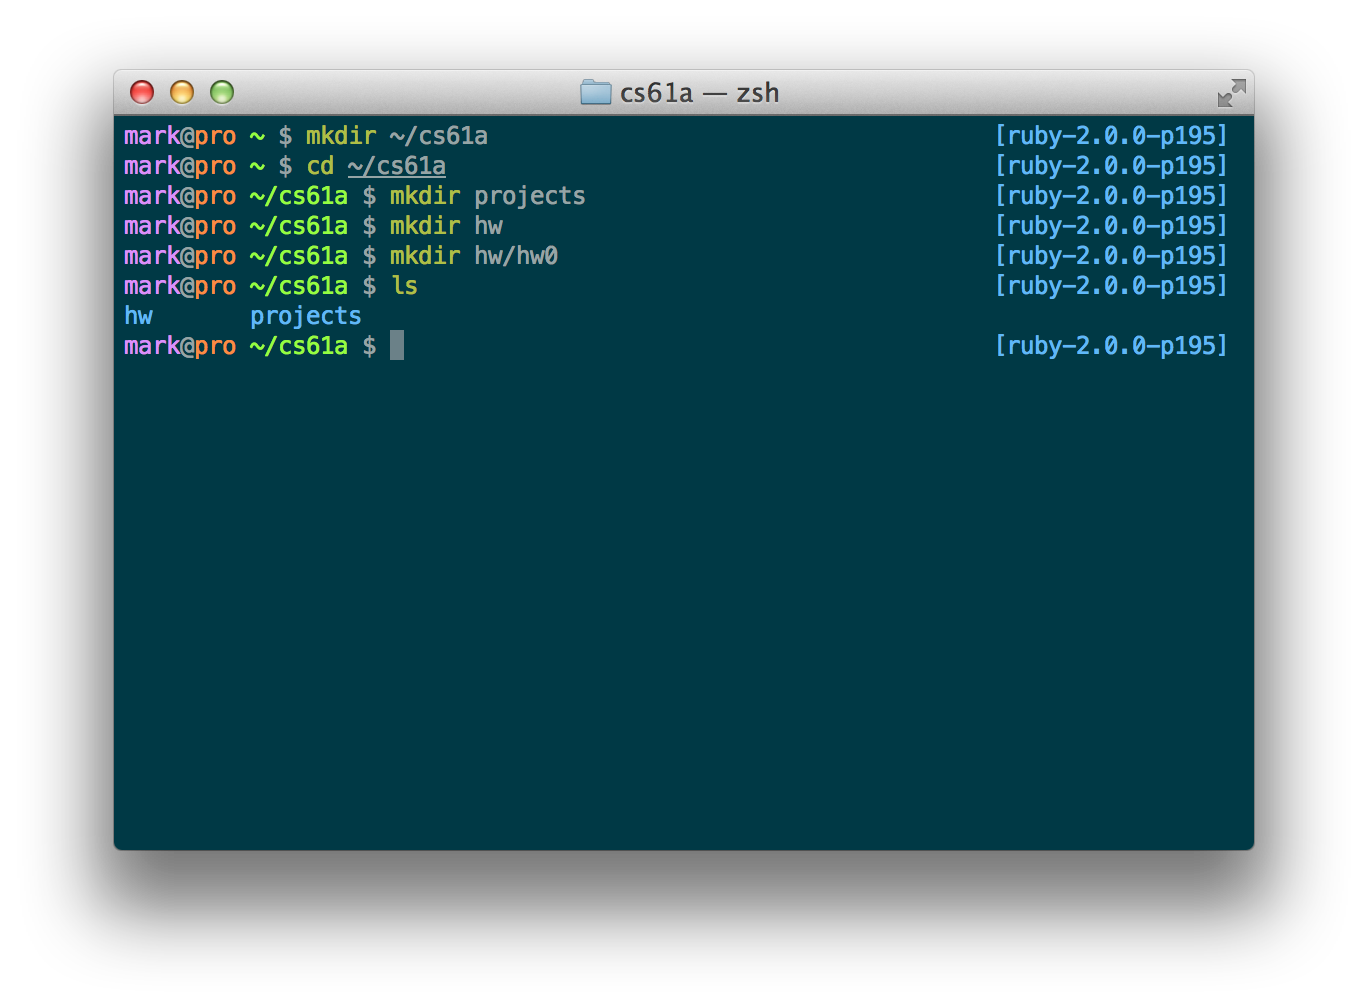
We can run commands like cd and ls just like before. Tip: It's generally a good idea to have a folder on your computer
that's dedicated to containing all of your material in from this course. Within that folder, you should keep a projects folder, a hw
folder, etc. We can make this folder in our home folder by typing mkdir ~/cs61a and magically, a folder will appear in our home directory! We can now cd
into this folder and add more folders for organization. Let's add a projects, hw, and a hw0 folder inside of our hw folder.
cd ~/cs61a
mkdir projects
mkdir hw
mkdir hw/hw0
Now if we list the contents of the directory (using ls), we can see that we have two folders, projects and hw.
The next thing we're going to do is find our downloaded file. If you didn't move the file at all, it's probably in ~/Downloads on
Mac/Linux/Windows (GitBash or Cygwin) or C:\Users\NAMEOFUSER\Downloads if you're using the Windows Command Line (cmd.exe). If your
downloads all go to your Desktop, on Mac/Linux/Windows (GitBash or Cygwin), that would be ~/Desktop and on the Windows Command
Prompt, that would be C:\Users\NAMEOFUSER\Desktop. Let's cd into that directory.
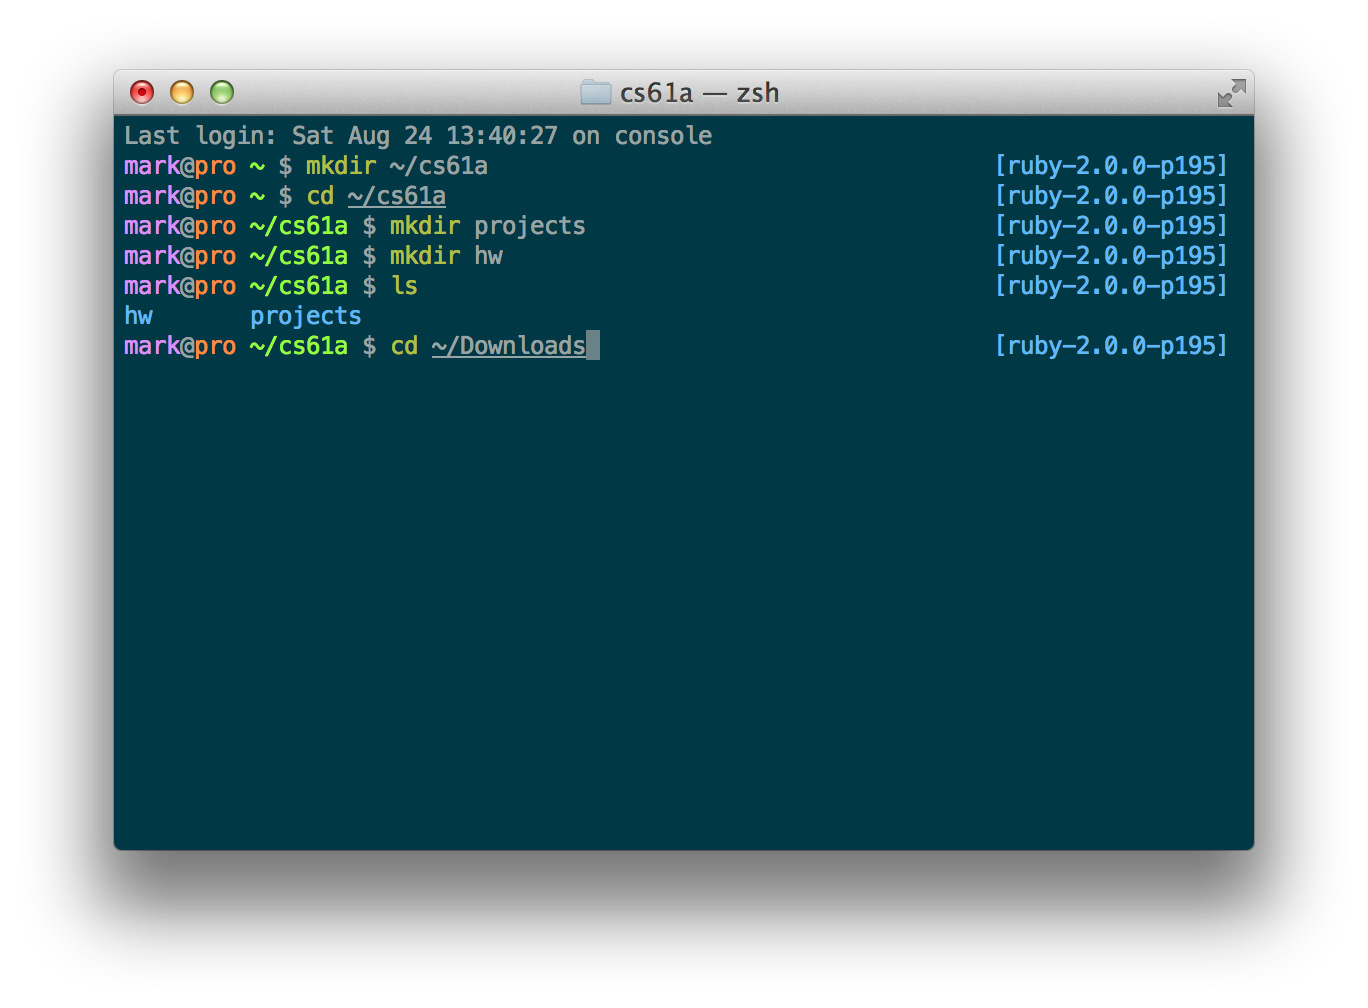
If we were to type ls, we'd see our file sitting there in our downloads folder. Let's move that file to our new homework directory.
mv ~/Downloads/hw0.py ~/cs61a/hw/hw0
This command says move the file located at ~/Downloads/hw0.py to the directory ~/cs61a/hw/hw0
And then we should change back into our hw0 folder that we made earlier.
cd ~/cs61a/hw/hw0
Okay, we're just about ready to start editing a file. Don't worry, if this seems complicated at first, it will get way easier over time. Just keep practicing!
Open up your file which is now located in ~/cs61a/hw/hw0 in your text editor of choice and let's begin editing.
In our productive workflow, we suggest having at least two windows open at all times.
So, let's get back to that doctest thing that we were talking about before. Again, doctests are a way for us to write simple tests for our code. We're basically asking ourselves, "What is the expected output of this function if I put in this specific input?"
To run our doctests, we switch over to our terminal and type in the following command:
python3 -m doctest hw0.py
This will give us a lot of output that shows which tests we are currently failing. Go ahead and try running it now on the file that you just downloaded. You should see something like this:

Oh man, we had 6 failures! :( Let's fix those up so that we have 0 failures. Before we can do that, we should analyze this output. In particular,
let's look at the my_last_name test that we failed, highlighted here:
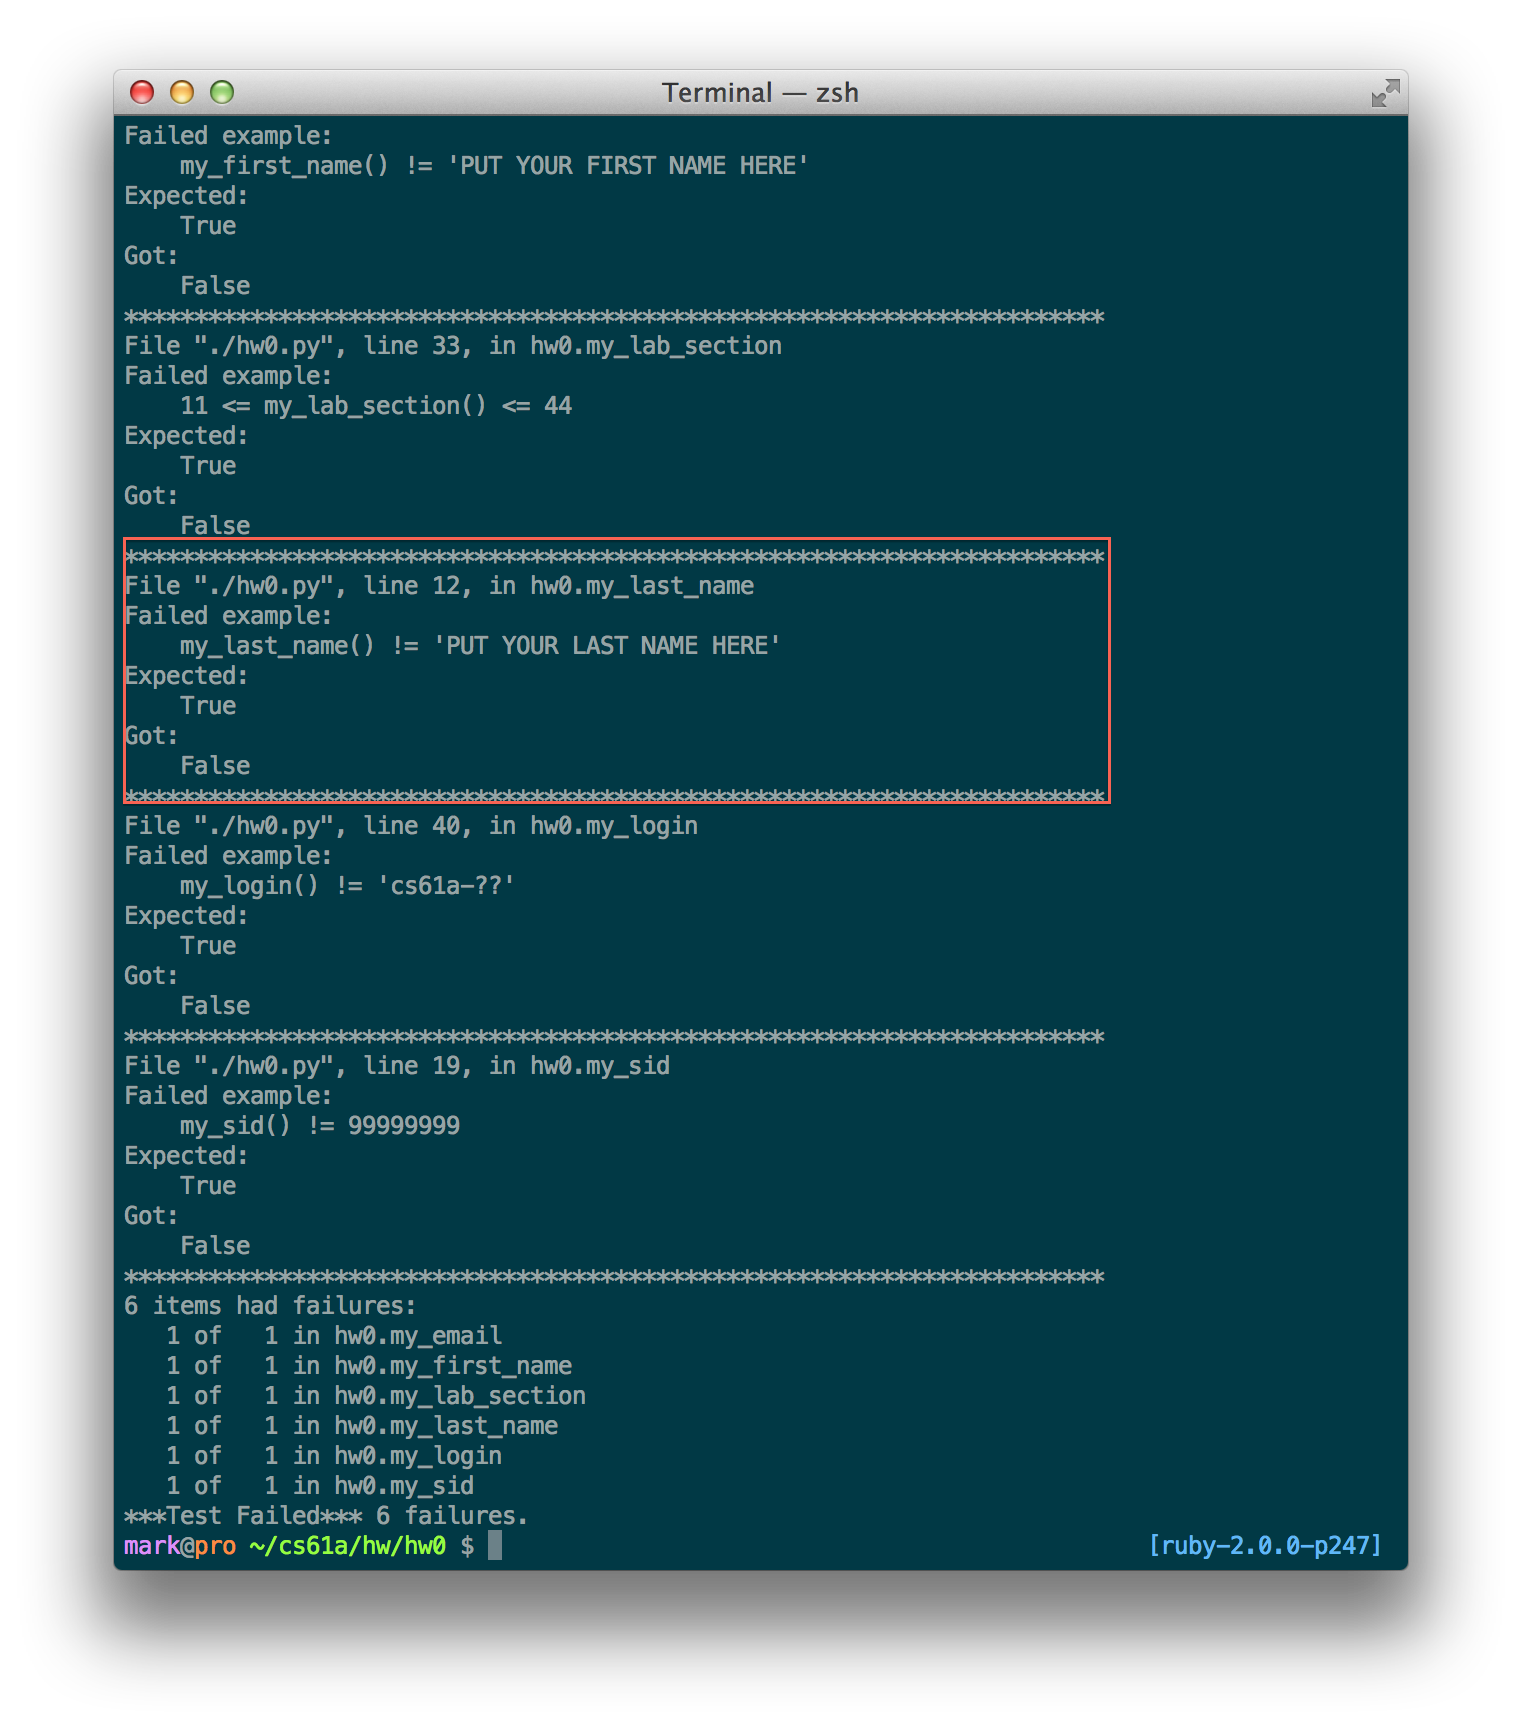
The output gives us some pretty good debugging info. If you haven't already, take a look at Albert's debugging guide
located here. Looking at this particular test. It's saying that we had an
error in our hw0.py file on line 12 in the function my_last_name. That's pretty useful because we know exactly where to
look for it. This is why line numbers are a must for our text editors. After we find the correct line, let's try to understand what the test is
saying. It's saying that the function my_last_name, when called with zero inputs, should not return the
string 'PUT YOUR LAST NAME HERE'. Except, ours is returning that string! Let's change that to your last name. Make sure you enter
this information in carefully because this is how we will associate all homework, projects, and exams with you and your account.
Once you have changed the return value of the function my_last_name (make sure that you're returning a string, which has quotes
around it), you should be able to run the doctests again and your test for my_last_name should pass! Now you only have 5 failures to
fix up!
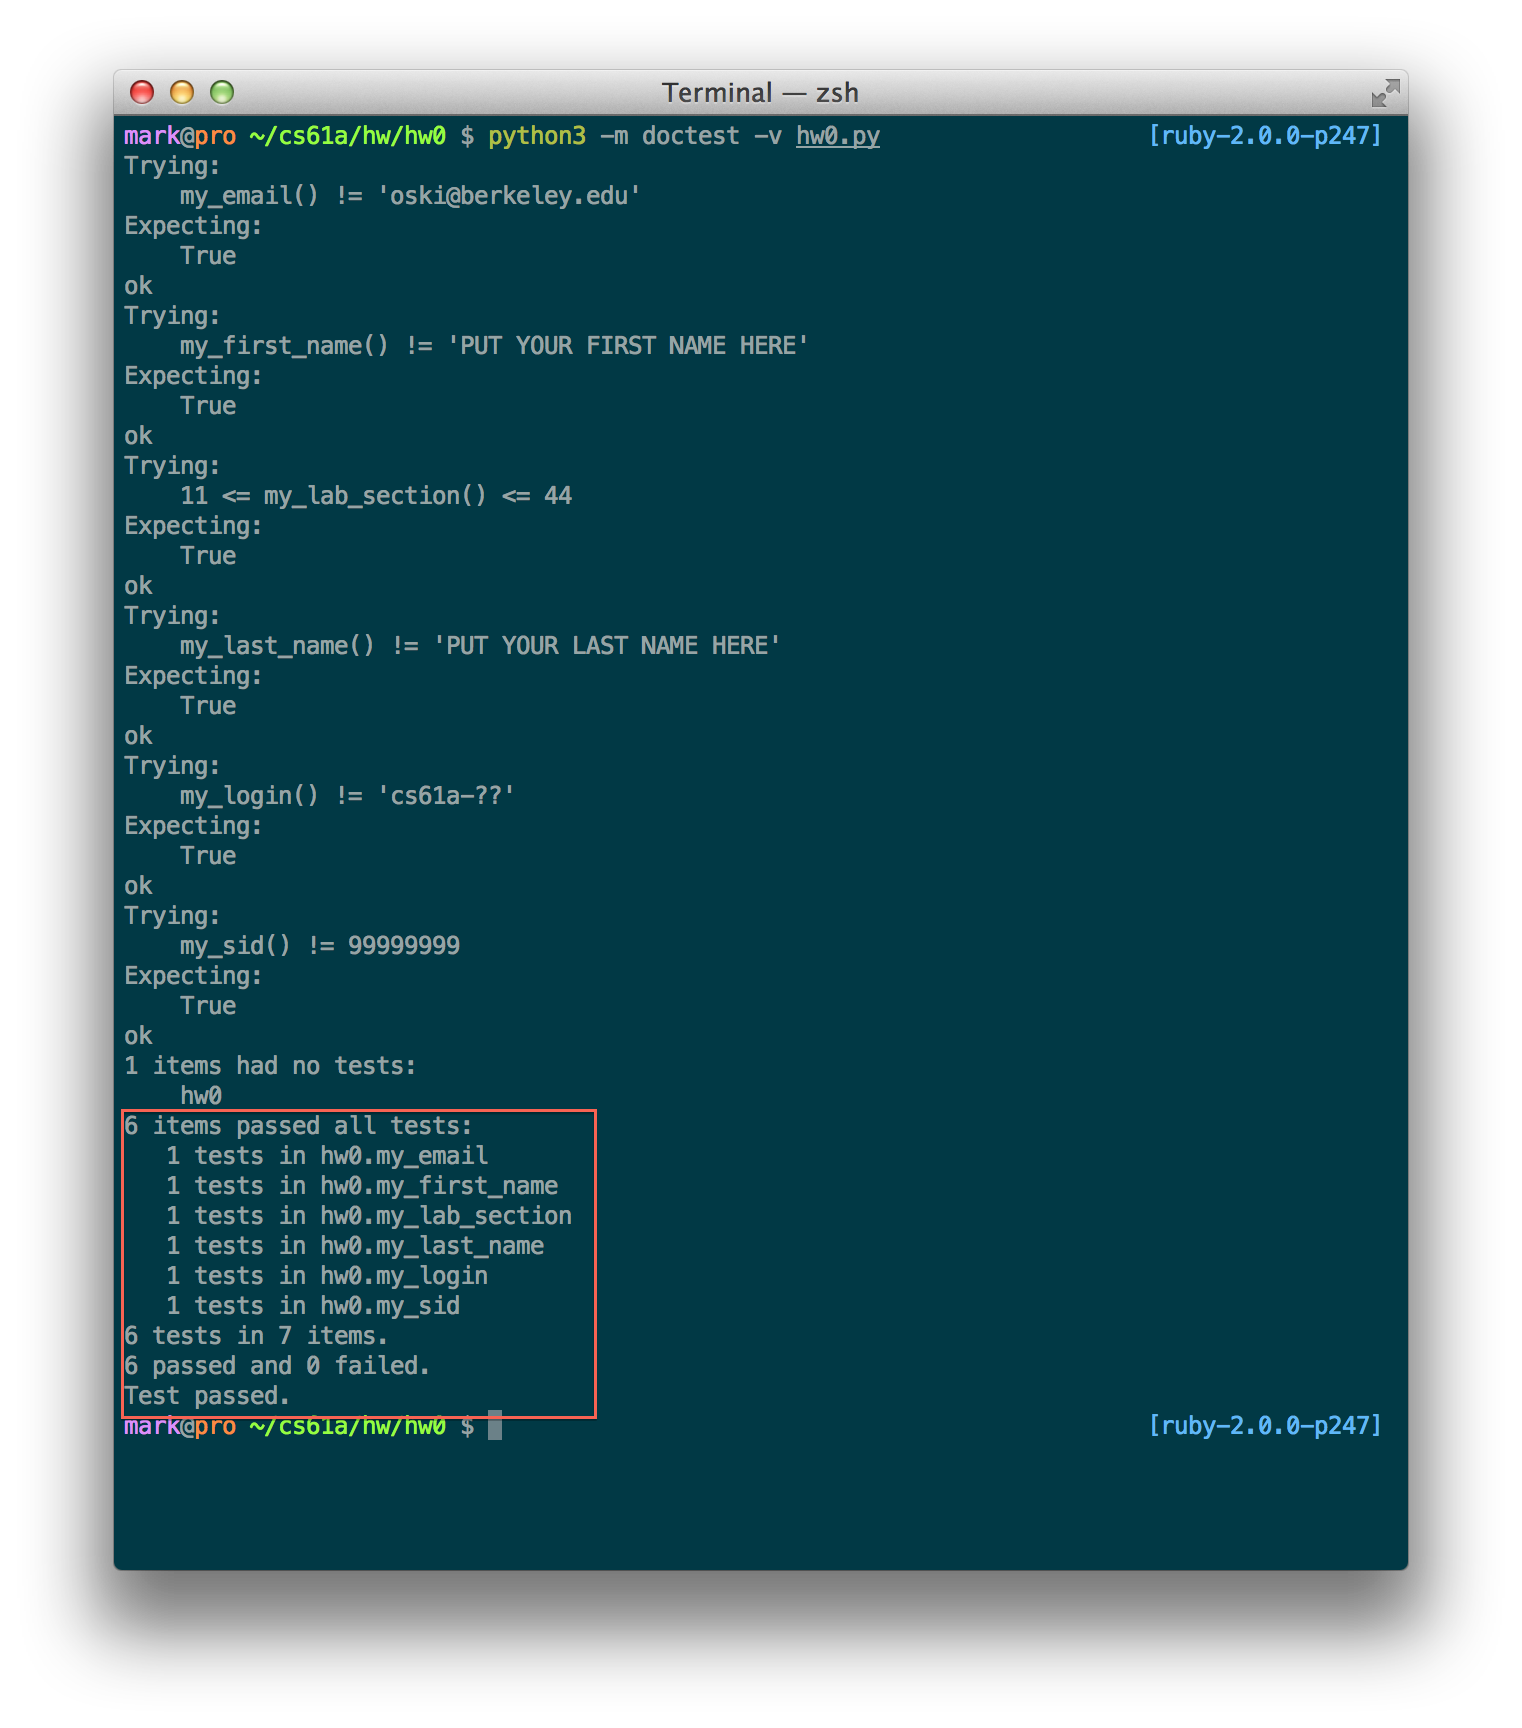
Some other things to note about doctests: You might run your doctests and see that there is no output. This is actually good. Doctests will only print out
a bunch of output when you have failures in your tests. However, if you have to be super sure that you're passing all of the tests and not just messing up the command, you can
add a command line flag -v to the command that we wrote up above to see the verbose output (which pretty much means see all output). This command looks
like:
python3 -m doctest -v hw0.py
For the section number, please put down your lab section number. This number will be between 11 and 44. You can find a complete list of all the sections on the class calendar which is located here.
Once you have successfully completed the homework and you have 0 tests failing, the verbose output of the doctests should look something like this:
Now that you have finished your first assignment of CS61A, it's time to copy the file to the server. The server is where your instructional account lives and it's how you will submit all of your homeworks and projects.
You'll need a method for copying your files to the server. For Windows, you'll want to download a program called WinSCP. Mac and Linux users can use the built in terminals that you've been using to run your doctests.
After you've installed WinSCP, you'll have to configure it so that you can log in to the server. Here's a screenshot of a typical log in:

Once you're logged in, all you have to do is navigate to your cs61a/hw folder on the left and drag your file over to the server on the right.
On Mac OS X and Linux, all you need is your terminal window that you were using before. Navigate to wherever you put your finished homework. If
you were following the tutorial from above, you'll want to type something like cd ~/cs61a/hw/hw0 to get to your homework 0
folder. Then you'll want to type the following command:
scp hw0.py cs61a-??@nova.cs.berkeley.edu:~/
Let's break this command down into three parts. The first part, scp is just the name of the command. The second
part, hw0.py is the path to the file(s) that you want to copy to the server. If you wanted, you could specify the whole path to the
file such as ~/cs61a/hw/hw0/hw0.py instead of just the filename. The reason why we can just specify the filename is because we're
already in the folder that contains it. The last part of the command is the destination. For this, we're logging into the server using your login
(the cs61a-??) part (make sure you change the question marks) and the server that we're logging into will be nova. A complete list of
servers can be found here. We generally use star
and nova. The text that comes after the server and colon is important. We're specifying where on the server we want the file to
go. In this case, we're placing it in our home directory which is represented by the ~ symbol. If we already had our homework folders
created on the server, we could specify the whole path (with something like scp hw0.py cs61a-??@nova.cs.berkeley.edu:~/hw/hw0).
After typing this command, you'll be asked for your password and then the file will transfer over! Now, we can move on to submitting!
Great, so now you have all of your files related to your assignment on the instructional servers but you're not done quite yet! We have to actually submit our files!
To log onto our instructional accounts, follow these tutorials:
To summarize, you'll be using a program called PuTTY for Windows and using a command calledssh on Mac / Linux.
The full command for ssh is (don't forget to replace the ?? with your login):
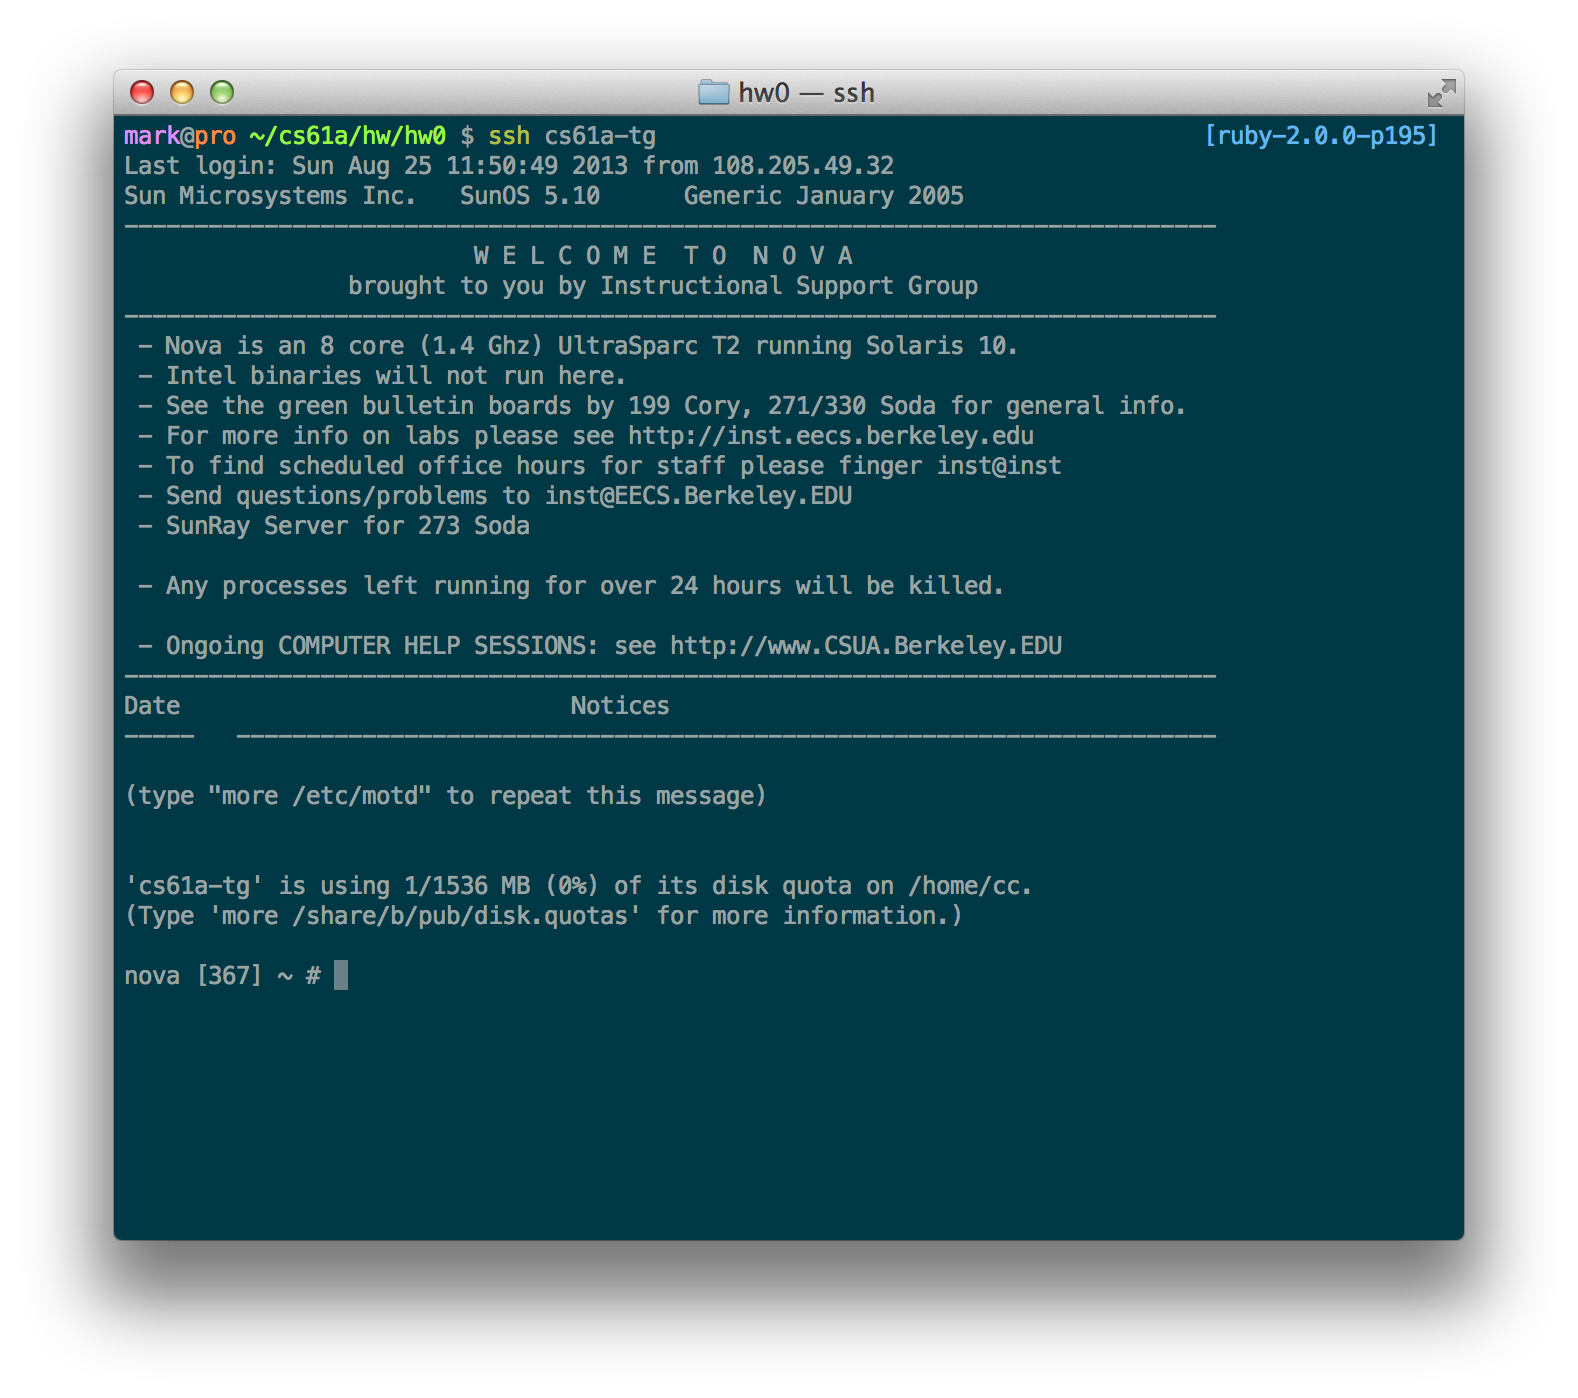
ssh cs61a-??@star.cs.berkeley.edu
Once logged in, you'll see something like this:
If you copied your files over correctly, you should be able to type ls and see your hw0.py file. If not, try to figure out what happened in the above steps. If
you're really stuck, try posting on Piazza first and if that still doesn't help, come talk to one of the TAs in office hours.
We're going to first create a new folder to hold our homework 0 file. In the future, you'll be submitting projects with multiple files so it's good to get in a habit of creating a new folder for each assignment.
Let's make the hw0 directory, move our hw0.py file into it, and then cd into our hw0 folder:
mkdir hw0
mv hw0.py hw0
cd hw0
We're all ready to submit our homework. But wait, we first need to check to make sure that we entered in the correct information into the sign up form. This is important because we'll use this information to send you automated emails with the scores of your projects. To check what you entered, type in:
check-register
If you find errors, fix them immediately by running the command:
re-register
Okay, now we're ready to submit. To do so, simply type:
submit hw0
Answer the questions that come up by typing yes or no. To check that you successfully submitted, you can type:
glookup -t
Glookup is the name of the command that you will use this semester to check your grades. At any time, you can simply enter glookup
to check for the grades of your submitted assignments (the ones that have been graded so far). Adding a -t to the glookup
command allows you to see all the times that you have successfully submitted a homework or project. You should see a successful submission of about 1 minute ago.
The autograder is a program that runs on our servers over your projects after you submit them. Once you submit your project, it will be added to the line of projects that we will then run the autograder over. When the autograder finishes running over your project, you'll receive an email with an automated response that lets you know how your project is doing (in terms of which tests you're passing and which ones you're failing). The autograder is a subset of the tests that we will run on your project to determine your grade meaning that it might catch some, but not all of your errors; however, it is a good indicator of how well you're doing on the project so far. This does mean that you should always write your own tests for your projects. We'll get into exactly what "good testing" is later on in this course, but the thing to realize right now is that you shouldn't rely on the autograder to determine the correctness of your project and that you should be using other methods to test your code!
To get you used to how the autograder works, we're going to be running a sample autograder over your hw0 submission and you should receive an email within 30 minutes.
This email will be similar to the one that you will receive for a project. If you don't get this email within an hour or so, make sure that you have a valid email address
entered under your account info. To check, run check-register to see which email you have registered with and re-register to change it.
Once you have received the autograder email from us and it says that you have passed all of the tests, you're good to go! Congrats, you just submitted your first CS61A assignment!