Which Digit?
 |
 |
 |
 |
 |
 |
 |
 |
 |
 |
 |
 |
 |
 |
 |
|
Which Digit? |
|
Due Thursday May 8 at 11:59pm
This project should be completed individually.
In this project, you will design classifiers and apply them to two tasks: face detection and digit recognition. A set of scanned handwritten digit images and a set of face images in which edges have been detected will be used to test your classifiers. Even your simple classifiers will be able to do quite well on these tasks with enough training data.
Optical character recognition (OCR) is the task of extracting text from sources in image formats. The first set of data you will run your classifiers on is a set of handwritten numerical digits (0-9). This is a very commercially useful technology similar to a technique used by the US post office to route mail by zip codes. There are systems that can perform with over 99% classification accuracy (see LeNet-5 for an example system in action).
Face detection is the task of localizing faces within video or still images where the faces can be at any location and vary in size. There are many applications for face detection including human computer interaction and surveillance applications. You will attempt a reduced face detection task in which you are presented with an image on which an edge detection algorithm has been computed. Your task will be to determine whether the edge image you have been presented is a face or not. There are several systems in use that perform quite well at the face detection task. One good system is the Face Detector by Schneiderman and Kanade. You can even try it out on your own photos in this demo.
The first classifier you must implement and apply to both the face and digit recognition tasks is the Naive Bayes classifier. You must also implement a second more sophisticated classifier and apply it to both tasks. For this part, the choice of classification scheme is left to you. For example, you could implement a perceptron, or adapt your neural network code from the previous assignment to this task, or use a nearest neighbor classifier, or a support vector machine, etc.
We have defined some simple features for you to use for your classifiers. We have one feature for each pixel location that can take values 0 or 1. As the final part of this project, you will implement more intelligent features to serve as input to your classifiers.
The code for this project contains the following files and data files, available as a zip file.
digitdata/ facedata/ |
Data files including digit and face data. |
classificationMethod.py |
Abstract superclass for the classifiers you will write. You do not need to modify this file. |
samples.py |
Code to read in the data. You do not need to modify this file. |
util.py |
Code defining some useful tools. |
mostFrequent.py |
A simple example classifier that labels every instance as the most frequent class. You do not need to modify this file. |
naiveBayes.py |
The main code where you will write your naive Bayes classifier. |
customClassifier.py |
The main code where you will write a classifier of your own design. |
perceptron.py |
Example framework for implementing a perceptron classifier. You may copy this code into customClassifier.py if you wish. |
dataClassifier.py |
The wrapper code that will call your classifiers. You will also write your enhanced feature extractor here. You can also use this code to analyze the results of your classifier. |
README |
Empty file. You'll need to enter a description of your classification algorithm and results here. Details are given in the section below. |
What to submit:
You will fill in portions of naiveBayes.py, customClassifier.py and
dataClassifier.py (only) during the assignment, and submit them along with
partners.txt and a REAME file under the project name p8.
Your README file should contain a brief description of the classification scheme you implemented and a comparison of its performance to that of Naive Bayes. In addition, this file should describe your enchanced feature extractor as well any improvements in classification accuracy it offered.
Evaluation (15 points total)
Naive Bayes (5 points)
Your naive Bayes classifier will be autograded for technical correctness. Please do not change the names of any provided functions or classes within the code, or you will wreak havoc on the autograder.
Custom Classifier (5 points)
We will review your custom classifier manually. You should explain in your README file what classification scheme you implemented and how it works.
Enhanced Feature Extractor (5 points)
You will need to implement enhanced feature extractors for digits and (optionally) faces as described below. You should aim to improve classification performance when using these features in conjunction with the simple features we have provided. More details on features can be found below.
To try out the classification pipeline, run dataClassifier.py from the command line. This
will classify the digit data using the default classifier (mostfrequent) which classifies every example
as the most frequent class.
> python dataClassifier.py
You can learn more about the possible command line options by running:
> python dataClassifier.py -h
util.counter wrapper for more convenience.
The data for the digit instances are encoded as 28x28 pixel images giving a vector of 784 features for each data item. Each feature is set to 0 or 1 depending on whether the pixel is on or not.
A canny edge detector has been run on some face and non-face images of size 60x70 pixels, giving a vector of 4200 features for each item. Like the digits, these features can take values 0 or 1 depending on whether there was an edge detected at each pixel.
naiveBayes.py.
You will fill in the following functions:
trainAndTune,
calculateLogPosteriorProbabilities, and
findHighOddsFeatures.
A naive Bayes classifier
models a joint distribution over a label ![]() and a set of observed
random variables, or features,
and a set of observed
random variables, or features,
![]() ,
using the assumption that the full joint distribution can be factored
as follows:
,
using the assumption that the full joint distribution can be factored
as follows:
To classify a datum, we can find the most probable class given the feature values for each pixel:
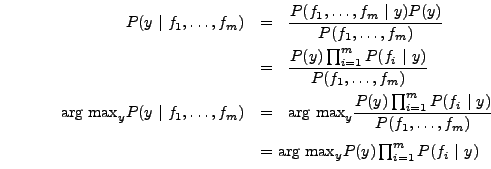
Because multiplying many probabilities together often results in underflow, we will instead compute log probability which will have the same argmax:

We can estimate ![]() directly from the training data:
directly from the training data:
The other parameters to estimate are the conditional probabilities of
our features given each label y:
![]() . We do this for each
possible feature value (
. We do this for each
possible feature value (![]() ).
).
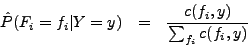
The basic smoothing method we'll use here is Laplace Smoothing which essentially adds k counts to every possible observation value:
![]()
If k=0 the probabilities are unsmoothed, as k grows larger the probabilities are smoothed more and more. You can use your validation set to determine a good value for k (note: you don't have to smooth P(C)).
Todo:
trainAndTune method in naiveBayes.py.
Your code should estimate
the conditional probabilities from the training data using different values
of the smoothing parameters (given in the list kgrid) and
evaluate the performance (accuracy) on the validation set to choose
the parameter with the highest accuracy on it (in case of ties,
prefer the lowest value of the smoothing parameter).
calculateLogPosteriorProbabilities code
which will use the conditional probability tables constructed by the
trainAndTune method and compute the log posterior probability
(as described in the theory question) for each class y for a given
passed feature vector. Read the comments to see what should be the
returned datastructure.
As a start, you can test your implementation of naive Bayes
with a specific value of the smoothing parameter with the command: > python dataClassifier.py -c naivebayes -k 2.0 analysis method in dataClassifier.py
to explore the mistakes that your classifier is making.-d digits or -d faces).
What are your classification accuracies? Explore the effect of varying the smoothing
parameter k on the performance of your classifer. Now compare the performance
of your classifiers by using 100 and 1000 training examples (use the -t 1000
option e.g.). Finally, make sure your implementation works when using the -a
flag which activates the automatic tuning of the smoothing parameters.
We highly suggest that your code prints out the validation set accuracy for
each value of k tried (though this is not required).
As a sanity check, if your implementation is correct, the following command: > python dataClassifier.py -a -d digits -c naivebayes -t 100util.Counter.argMax function.
Can you explain why the optimal value of k varies as it does when going from 100 to 1000
training examples? Look at the validation set accuracy for digits varying the size of
the training set up to 2500 training examples.
What can you observe about the performance? Does it look like it's leveled off?
We will test your code with the following commands
(on a new test set though), so make sure that they work:
> python dataClassifier.py -a -d digits -c naivebayes -t 1000
> python dataClassifier.py -a -d faces -c naivebayes -t 100
Another tool for understanding the parameters is to look at odds ratios. For each pixel
feature ![]() and classes
and classes ![]() , consider the odds ratio:
, consider the odds ratio:
The features that will have the greatest impact at classification time are those with both a high probability (because they appear often in the data) and a high odds ratio (because they strongly bias one label versus another).
Todo:
findHighOddsFeatures(self, class1, class2).
It should return 3 lists: featuresClass1
which are the 100 features with largest
-o to activate the odds ratio analysis;
and the options -1 class1 -2 class2 to specify which class1 and
class2 to use in your odds ratio analysis. Look at the 100 most likely pixels
for the numbers customClassifier.py.
You will fill in the train and classify functions for a classification scheme of your choice.
perceptron.py
More creative solutions are encouraged and excellent performance may be rewarded with up to two (2)
bonus points.
Building classifiers is only a small part of getting a good system working for a task. Indeed, the main difference between a good system and a bad one is not necessarily the classifier itself (e.g. perceptron vs. naive Bayes), but rather rests on the quality of the features used. So far, we have used the simplest possible features: the identity of each pixel.
To increase your classifier's accuracy further, you will need to extract
more useful features from the data. The EnhancedFeatureExtractorDigit
in dataClassifier.py is your new playground. Look at some of your errors.
You should look for characteristics of the input that would
give the classifier useful information about the label.
For instance in the digit data, consider the number of
separate, connected regions of white pixels, which varies by digit type.
1, 2, 3, 5, 7 tend to have one
contiguous region of white space while the loops in 6, 8, 9 create more.
The number of white regions in a
4 depends on the writer. This is an example of a feature that is not directly
available to the classifier from the per-pixel information. If your feature
extractor adds new features that encode these properties,
the classifier will be able exploit them.
Todo:
enhancedFeatureExtractorDigit function) in such a way that it works
with your implementation of the naive Bayes classifier: this means that
for this part,
you are restricted to features which can take a finite number of discrete
values (and if you have used the simpler implementation where you assumed
that the features were binary valued, then you are restricted to binary features).
Note that you can encode a feature which takes 3 values [1,2,3] by using 3
binary features, of which only one is on at the time, to indicate which
of the three possibilities you have. This doesn't work well with the conditional
independence assumption of Naive Bayes, but it can still work in practice.
We will test your classifier with the following command:
> python dataClassifier.py -d digits -c naivebayes -f -a -t 1000
With the basic features (without the -f option), your optimal
choice of smoothing parameter should yield 82% on the validation set with a
test performance of 78%. Try to implement enhanced features which improve
on this performance.
enhancedFeatureExtractorFace and demonstrate that they improve
classification performance on faces.