Project 3: Build a Single-Server Key-Value Store
Overview
For project 3, you will build a key-value storage system complete with code for a central key-value server (with caching), client-side libraries, and all necessary networking components.
Multiple clients will be communicating with a single key-value server in a given messaging format (KVMessage) using a KVClient. Communication between the clients and the server will take place over the network through sockets (SocketServer and ServerClientHandler). The KVServer uses a ThreadPool to support concurrent operations across multiple sets in a set-associative KVCache, which is backed by a KVStore.
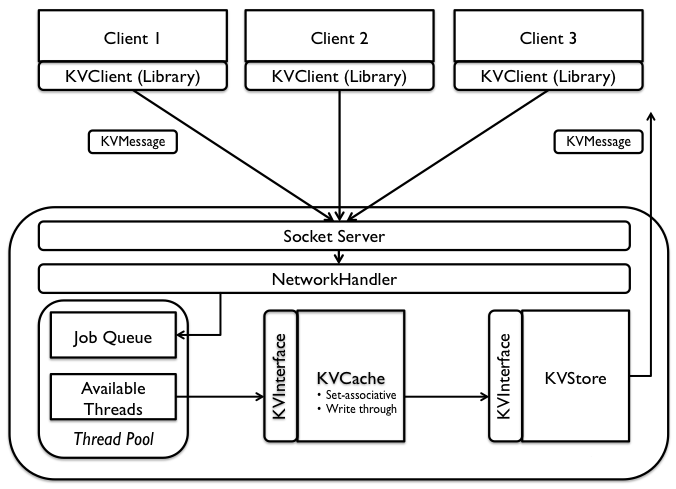
Figure: A single-node key-value store with three clients making simultaneous requests.
General Rules
- Keep up with the project clarifications thread on Piazza.
- All XML serialization and deserialization must use Java XML libraries (you may want to look into javax.xml, org.w3c.dom and org.xml.sax). You are not allowed to use string concatenation for any XML-related tasks. You do not need to use these built-in libraries, but note that several tasks involve XML parsing and that your group should be consistent in library usage (use the same one across the project).
- You may use external libraries by adding jar files to your lib directory. The build.xml will include all lib/*.jar files in your classpath (see testing section below for more details). We will grade your submission with your lib directory but with our own build.xml which will be similar to the one provided). You should check with your TA or on Piazza before adding jar files as we generally discourage using external libraries for anything other than XML [de]serialization as it increases the possibility of compatibility issues during grading.
- Do not use any built-in thread-safe data structures unless we have provided it in our skeleton. This means that you should use the synchronized keyword or a ReentrantLock to protect non thread-safe data structures like HashMap and LinkedList.
- Bulletproof your code, such that the key-value server does not crash while processing a request.
- If an error occurs at any point while processing a request that prevents a successful response, a KVException should be propogated to the client. The user of KVClient should see a KVException containing a KVMessage with an error string from KVConstants.java. We will be testing using this set of error messages. You may define additional error message if you feel the need, but the provided set of errors should be sufficient for all major cases. Every member should read through KVConstants.
Task 1 (15%) KVClient
Implement the KVClient class, which issues requests and handles responses. To send a request to the server over the network, requests must be serialized (read: converted to XML) to be sent through a socket (java.net.Socket). Use the KVMessage functionality you will implement in task 2 to send requests and receive responses. Note: sockets are only good for sending data and receiving data once, meaning every request must be made with a new socket (and as a result, the server processes each request completely independently). Do not use the KVMessage constructor with a timeout (read about it in task 2).
Task 2 (25%) KVMessage
You will be implementing a message class with serialization and deserialization. While parsing the InputStream of a socket, many parsers call close on the stream when finished reading. This inadvertently closes the OutputStream of the socket as well, preventing the user from sending a response through the same socket. To deal with this issue, we provide a private class, NoCloseInputStream, which you should use as appropriate. The KVMessage constructor with timeout should not be directly used in this project, as we have not given you a reason to use it yet. You will still need to implement it, as another constructor (that you should be using) calls it with a timeout of 0. Check out the Socket API for more information. You will need to implement the KVMessage(Socket sock, int timeout) constructor for project 3, but you should only directly call KVMessage(Socket sock) in project 3 since we will not worry about timeouts (there should always be a response). In project 4, you will call the timeout constructor directly.
A KVMessage must serialize to the following formats. Italicized
fields should be replaced with the appropriate values.
Newlines/indentation
are added only for readability on the spec.
|
putreq
|
<?xml version="1.0"
encoding="UTF-8"?> |
|
getreq
|
<?xml version="1.0" encoding="UTF-8"?> |
|
delreq
|
<?xml version="1.0" encoding="UTF-8"?> |
|
successful putreq
|
<?xml version="1.0" encoding="UTF-8"?> |
|
successful getreq
|
<?xml version="1.0" encoding="UTF-8"?> |
|
successful delreq |
<?xml version="1.0" encoding="UTF-8"?> |
|
Unsuccessful put/get/del request
|
<?xml version="1.0" encoding="UTF-8"?> |
Task 3 (20%) KVCache
Implement a set-associative KVCache with the second-chance eviction policy within each set. Each set in the cache will have a fixed number of entries, and evict entries (when required) using the second-chance algorithm. Note that this is not the clock algorithm, thus do not keep track of clock hands.
- When get is called on a key, the reference bit of that entry is set to True.
- If put is called on an existing key, the value is overwritten in the existing entry and the reference bit is set to True. The entry's position in the queue remains the same.
- If put is called while the set is not full, the entry should be added to the end of the queue immediately.
- If put is called when the set is full, the first entry with a False reference bit while cycling through the queue should be replaced.
KVCache.toXML() output example:
<?xml version="1.0" encoding="UTF-8"?>

    <KVCache>

      <Set Id="id">

        <CacheEntry isReferenced="true/false">

          <Key>key</Key>

          <Value>value</Value>

        </CacheEntry>

      </Set>

    </KVCache>
There should be as many Set elements as there are sets, and within each set, there should be as many CacheEntry elements as there are entries that exist in each set. As mentioned earlier, the number of sets and the number of elements in each sets will be given in the constructor. Sets must have ids starting from 0.
Task 4 (20%) KVServer, KVStore
All requests (get/put/del) are atomic in that they must modify the state of both the cache and the store together. Requests must be parallel across different sets (as decided by KVCache) and serial within the same set. To enforce atomicity from KVServer, obtain a lock from the KVCache for the set the key belongs to. You do not need to implement readers/writers. You should follow a write-through caching policy. If a key exists in the cache for a get request, do not access the store (imagine the store access takes a long time, even though it doesn't as provided).
KVStore.dumpToFile output format:
<?xml version="1.0"
    encoding="UTF-8"?>

    <KVStore>

      <KVPair>

       <Key>key1</Key>

       <Value>value1</Value>

      </KVPair>

      <KVPair>

        <Key>key2</Key>

        <Value>value2</Value>

      </KVPair>

    </KVStore>
Task 5 (20%) SocketServer, ServerClientHandler, ThreadPool
Your server must be able to service requests from the client. The SocketServer class will create a serversocket (java.net.ServerSocket) that listens on a port for connections. A socket should be passed to the ServerClientHandler for each request that comes in. The ThreadPool will then execute jobs created by the handler in parallel and return responses for each request. A thread pool allows a system to service jobs concurrently, yet limiting the total number of threads spawned in the system (rather than spawning a thread per request).
Source Code and Testing
The project skeleton has been pushed to your group as a GitHub repository named group<#>-kvstore. You can define additional classes and methods as you deem fit, but you must not modify the defined prototypes/interfaces. The Javadocs provided should be helpful as a guide to the implementation of each method.
The project is packaged for ant and includes a basic testing framework. The files SampleClient and SampleServer are given as examples on how to run a client and server in a standalone fashion. To use them, simply run the main method of the SampleServer class followed by the main method of the SampleClient class. EndToEndTemplate includes this sequence in JUnit setup and teardown methods. The provided tests should serve as a sanity check. You are expected to add tests to existing classes and add new classes of tests to your suite.
Command Line
To run all JUnit tests (up to the first failure), from within your kvstore directory:
$ ant test
To run a specific class of tests:
$ ant runtest -Dtest=KVClientTest
You can also use the following commands to clean and compile the project (though the above commands automatically compile):
$ ant clean
$ ant compile
Note: Our ant build.xml file requires JDK 7 (javac 1.7.x). Upgrade if you do not have that installed locally. Use an inst machine if you do not want to upgrade locally.
Eclipse
You are welcome to use Eclipse exclusively while developing and testing. To import the project, create a new Java Project with your kvstore directory as the location of the project and click Finish. Do not import the project as an Java Project with Ant as the build.xml file we provided does not directly support the javac target.
After importing the project, you can still run ant from within Eclipse by going to Run > External Tools > External Tools Configurations. Then create a new Ant Build configuration, specifying the path of your Buildfile (build.xml). Under the Targets configuration tab, choose test [default] and save this configuration with some name like "run all tests". Similarly, you can create configurations to run only single suites of tests at a time by selecting the target runtest and supplying the -Dtest=<Testclass> (like above) as an argument on the Main configuration tab. This should be equivalent to running the JUnit tests directly. We will, however, be grading on hive with ant, so you should make sure your project passes our tests there too before you submit. Note: If you are ever unable to get the tests working locally and you notice that the local port of the client socket does not match the remote port on the server-side socket, it is possible that Cisco AnyConnect is the culprit. You should uninstall it if you don't use it.
Submission
Initial design (Tue 4/8)
Follow the general outline of our design doc template. 15 page maximum. For testing, include a one to two sentence description of each test case you plan on implementing for each class and the reason for including them (what they test).
Code with JUnit tests (Thu 4/17)
Submit a tarball (cs162-proj3.tar.gz) of your code and tests to proj3-code by running the following command (use a hive server if you don't have ant installed).
$ ant handin
Final design and Group Evals (Fri 4/18)
For testing, include a description on each test case you have implemented for each class. Our evaluation of your test cases will be worth 10 of the 20 points on your final design. We are looking for unit tests with good code coverage and integration tests that verify the behavior of your system. 18 page maximum (extra 3 pages for tests).
Acknowledgements
Project packaging inspired by the SimpleDB project given in CS186 at Berkeley. Thanks :)